Epson 7880 User's Guide - Page 190
Installing the Manual Media Cutting System, Installing and Using Optional Equipment
 |
UPC - 010343866874
View all Epson 7880 manuals
Add to My Manuals
Save this manual to your list of manuals |
Page 190 highlights
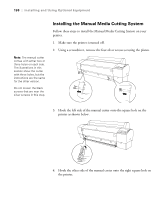
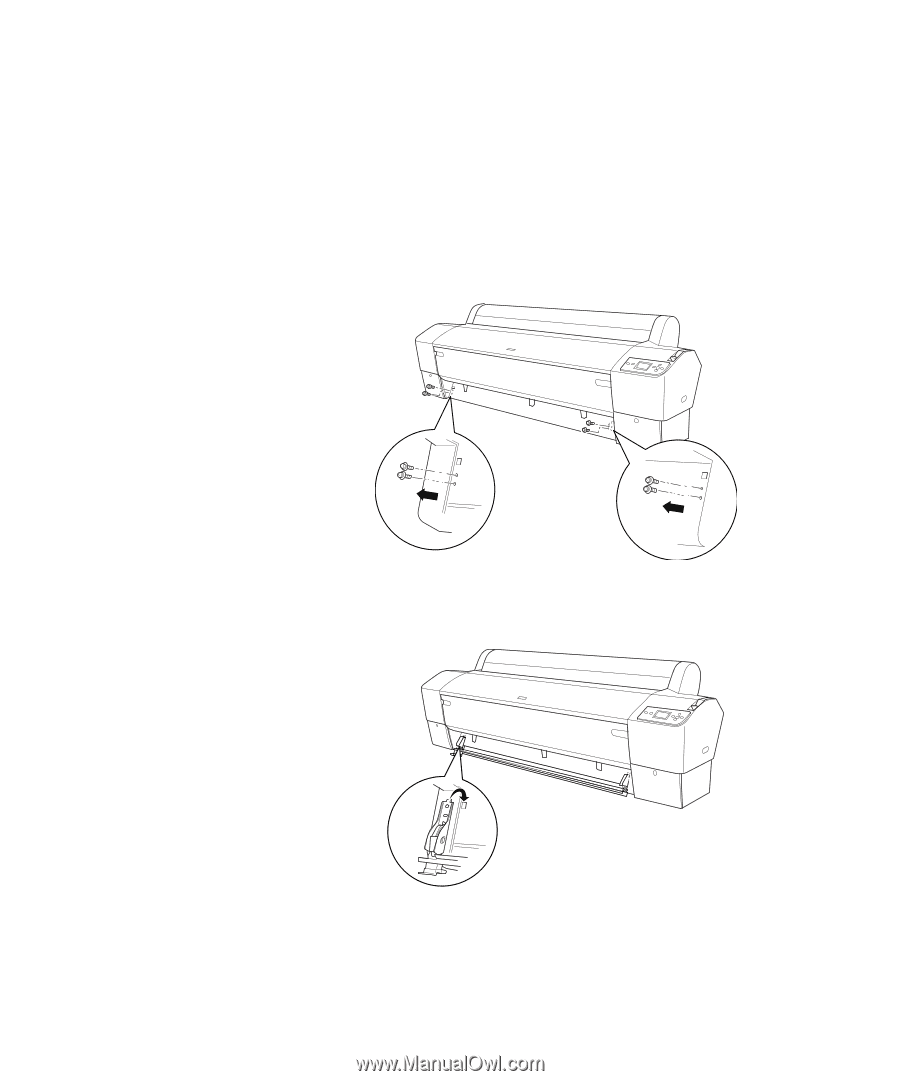
190 | Installing and Using Optional Equipment Note: The manual cutter comes with either two or three holes on each side. The illustrations in this section show the cutter with three holes, but the instructions are the same for the other version. Do not loosen the black screws that are near the silver screws in this step. Installing the Manual Media Cutting System Follow these steps to install the Manual Media Cutting System on your printer. 1. Make sure the printer is turned off. 2. Using a screwdriver, remove the four silver screws securing the platen. 3. Hook the left side of the manual cutter onto the square hole on the printer as shown below. 4. Hook the other side of the manual cutter onto the right square hole on the printer. 190
-
 1
1 -
2
-
3
-
4
-
5
-
6
-
7
-
8
-
9
-
10
-
11
-
12
-
13
-
14
-
15
-
16
-
17
-
18
-
19
-
20
-
21
-
22
-
23
-
24
-
25
-
26
-
27
-
28
-
29
-
30
-
31
-
32
-
33
-
34
-
35
-
36
-
37
-
38
-
39
-
40
-
41
-
42
-
43
-
44
-
45
-
46
-
47
-
48
-
49
-
50
-
51
-
52
-
53
-
54
-
55
-
56
-
57
-
58
-
59
-
60
-
61
-
62
-
63
-
64
-
65
-
66
-
67
-
68
-
69
-
70
-
71
-
72
-
73
-
74
-
75
-
76
-
77
-
78
-
79
-
80
-
81
-
82
-
83
-
84
-
85
-
86
-
87
-
88
-
89
-
90
-
91
-
92
-
93
-
94
-
95
-
96
-
97
-
98
-
99
-
100
-
101
-
102
-
103
-
104
-
105
-
106
-
107
-
108
-
109
-
110
-
111
-
112
-
113
-
114
-
115
-
116
-
117
-
118
-
119
-
120
-
121
-
122
-
123
-
124
-
125
-
126
-
127
-
128
-
129
-
130
-
131
-
132
-
133
-
134
-
135
-
136
-
137
-
138
-
139
-
140
-
141
-
142
-
143
-
144
-
145
-
146
-
147
-
148
-
149
-
150
-
151
-
152
-
153
-
154
-
155
-
156
-
157
-
158
-
159
-
160
-
161
-
162
-
163
-
164
-
165
-
166
-
167
-
168
-
169
-
170
-
171
-
172
-
173
-
174
-
175
-
176
-
177
-
178
-
179
-
180
-
181
-
182
-
183
-
184
-
 185
185 -
 186
186 -
 187
187 -
 188
188 -
 189
189 -
 190
190 -
 191
191 -
 192
192 -
 193
193 -
 194
194 -
 195
195 -
196
-
197
-
198
-
199
-
200
-
201
-
202
-
203
-
204
-
205
-
206
-
207
-
208
-
209
-
210
-
211
-
212
-
213
-
214
-
215
-
216
-
217
-
218
 |
 |
190
190
|
Installing and Using Optional Equipment
Installing the Manual Media Cutting System
Follow these steps to install the Manual Media Cutting System on your
printer.
1.
Make sure the printer is turned off.
2.
Using a screwdriver, remove the four silver screws securing the platen.
3.
Hook the left side of the manual cutter onto the square hole on the
printer as shown below.
4.
Hook the other side of the manual cutter onto the right square hole on
the printer.
Note:
The manual cutter
comes with either two or
three holes on each side.
The illustrations in this
section show the cutter
with three holes, but the
instructions are the same
for the other version.
Do not loosen the black
screws that are near the
silver screws in this step.