Epson 7880 User's Guide - Page 209
Network Guide, MAINTENANCE menu, HEAD ALIGNMENT menu see for details
 |
UPC - 010343866874
View all Epson 7880 manuals
Add to My Manuals
Save this manual to your list of manuals |
Page 209 highlights
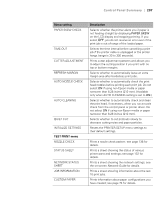
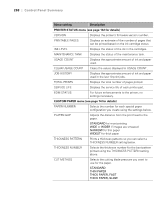
Control Panel Summary | 209 Menu setting Description PAPER FEED ADJUST Adjusts the amount of paper fed during printing to help eliminate banding (-0.70 to 0.70%). Choose a lower value if you see white lines on your prints, or a higher value if you see dark lines. DRYING TIME Selects a drying time for ink to avoid smearing (from 0 to 10 seconds). PAPER SUCTION Adjusts the suction pressure when printing on thin paper or backlight film. STANDARD -1 to -4 M/W ADJUSTMENT Adjust the intensity of the MicroWeave pattern to improve print quality, but lower print speed. STANDARD 1 or 2 MAINTENANCE menu CUTTER REPLACEMENT Starts procedure to replace the paper cutter blade; see page 151 for details. BK INK CHANGE Starts the procedure to replace the black ink cartridge type; see page 145 for details. POWER CLEANING Starts a print head power cleaning cycle; see page 138 for details. CLOCK SETTING Sets the printer date and time settings; see page 149 for details. CONTRAST ADJUSTMENT Adjusts the contrast of the LCD display. HEAD ALIGNMENT menu (see page 139 for details) PAPER THICKNESS Select the paper thickness for aligning the print head. ALIGNMENT Select and start running print head alignment of various types. NETWORK SETUP menu (see the on-screen Network Guide for details) NETWORK SETUP Select to enable or disable network printing. IP ADDRESS SETTING Select to set the IP address automatically or manually. 209
-
 1
1 -
2
-
3
-
4
-
5
-
6
-
7
-
8
-
9
-
10
-
11
-
12
-
13
-
14
-
15
-
16
-
17
-
18
-
19
-
20
-
21
-
22
-
23
-
24
-
25
-
26
-
27
-
28
-
29
-
30
-
31
-
32
-
33
-
34
-
35
-
36
-
37
-
38
-
39
-
40
-
41
-
42
-
43
-
44
-
45
-
46
-
47
-
48
-
49
-
50
-
51
-
52
-
53
-
54
-
55
-
56
-
57
-
58
-
59
-
60
-
61
-
62
-
63
-
64
-
65
-
66
-
67
-
68
-
69
-
70
-
71
-
72
-
73
-
74
-
75
-
76
-
77
-
78
-
79
-
80
-
81
-
82
-
83
-
84
-
85
-
86
-
87
-
88
-
89
-
90
-
91
-
92
-
93
-
94
-
95
-
96
-
97
-
98
-
99
-
100
-
101
-
102
-
103
-
104
-
105
-
106
-
107
-
108
-
109
-
110
-
111
-
112
-
113
-
114
-
115
-
116
-
117
-
118
-
119
-
120
-
121
-
122
-
123
-
124
-
125
-
126
-
127
-
128
-
129
-
130
-
131
-
132
-
133
-
134
-
135
-
136
-
137
-
138
-
139
-
140
-
141
-
142
-
143
-
144
-
145
-
146
-
147
-
148
-
149
-
150
-
151
-
152
-
153
-
154
-
155
-
156
-
157
-
158
-
159
-
160
-
161
-
162
-
163
-
164
-
165
-
166
-
167
-
168
-
169
-
170
-
171
-
172
-
173
-
174
-
175
-
176
-
177
-
178
-
179
-
180
-
181
-
182
-
183
-
184
-
185
-
186
-
187
-
188
-
189
-
190
-
191
-
192
-
193
-
194
-
195
-
196
-
197
-
198
-
199
-
200
-
201
-
202
-
203
-
 204
204 -
 205
205 -
 206
206 -
 207
207 -
 208
208 -
 209
209 -
 210
210 -
 211
211 -
 212
212 -
 213
213 -
 214
214 -
215
-
216
-
217
-
218
 |
 |
