Epson ActionNote 866 User Manual - Page 75
Removing and Replacing the Hard Disk, height of 19 mm.
 |
View all Epson ActionNote 866 manuals
Add to My Manuals
Save this manual to your list of manuals |
Page 75 highlights
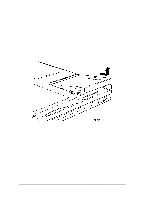
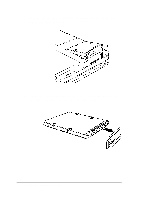
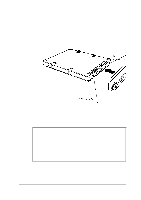
Caution Do not change the setting of a PC memory card's write-protect switch while the card is installed in the computer or you may damage the card. First eject the card, then change the switch setting and reinsert it. When you want to remove the PC card, check the PC card indicator light to verify that the computer is not accessing the card. If you are using a LAN card, you may also want to log out. Then press the appropriate release button to eject the card and store it properly in the case that came with it. See Chapter 2 for instructions on configuring your PC card(s). Removing and Replacing the Hard Disk If you want to install a higher capacity hard disk drive in your ActionNote or remove the existing drive for service, you can follow the instructions below. You should not need any tools. Your ActionNote supports hard disk drives that have a 2.5-inch form factor and a standard IDE interface, with a maximum height of 19 mm. Caution Before you replace your hard disk drive, be sure to make backup copies of all your files and programs. Use the MWBACKUP utility in the Windows Applications group or the MS-DOS BACKUP command. Refer to the Windows Help utility for instructions on using MWBACKUP; use the MS-DOS help utility for instructions on using BACKUP. 4-6 Installing Optional Devices
-
 1
1 -
2
-
3
-
4
-
5
-
6
-
7
-
8
-
9
-
10
-
11
-
12
-
13
-
14
-
15
-
16
-
17
-
18
-
19
-
20
-
21
-
22
-
23
-
24
-
25
-
26
-
27
-
28
-
29
-
30
-
31
-
32
-
33
-
34
-
35
-
36
-
37
-
38
-
39
-
40
-
41
-
42
-
43
-
44
-
45
-
46
-
47
-
48
-
49
-
50
-
51
-
52
-
53
-
54
-
55
-
56
-
57
-
58
-
59
-
60
-
61
-
62
-
63
-
64
-
65
-
66
-
67
-
68
-
69
-
 70
70 -
 71
71 -
 72
72 -
 73
73 -
 74
74 -
 75
75 -
 76
76 -
 77
77 -
 78
78 -
 79
79 -
 80
80 -
81
-
82
-
83
-
84
-
85
-
86
-
87
-
88
-
89
-
90
-
91
-
92
-
93
-
94
-
95
-
96
-
97
-
98
-
99
-
100
-
101
-
102
-
103
-
104
-
105
-
106
-
107
-
108
-
109
-
110
-
111
-
112
-
113
-
114
-
115
-
116
-
117
-
118
-
119
-
120
-
121
-
122
-
123
-
124
-
125
-
126
-
127
-
128
-
129
-
130
-
131
-
132
-
133
-
134
-
135
-
136
-
137
-
138
-
139
 |
 |
