Epson ActionNote 866 User Manual - Page 85
Installing a Memory Module, expensive to replace; so if you don't feel confident about
 |
View all Epson ActionNote 866 manuals
Add to My Manuals
Save this manual to your list of manuals |
Page 85 highlights
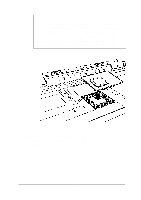
4. Position the plastic strip above the keyboard and snap it into place. The strip fits tightly, but it should not obstruct the function keys. 5. Slide the plastic caps over the screws on each side of the case below the screen and snap them into position. Make sure you use the correct cap for the left or right side; they will not slide into place on the wrong side. After you have replaced the keyboard, check that the function keys operate smoothly. If any of the keys tend to stick, repeat the keyboard replacement procedure. Installing a Memory Module Your computer comes with 4MB of memory soldered on the system board. If it has more than 4MB memory, it already has a memory module installed. You can check the amount of memory installed by running the Setup program. See "Running the Setup Program" in Chapter 1 for instructions. You can increase your computer's memory up to 24MB by installing a 4, 8, 16, or 20MB memory module. Caution The memory module can be easily damaged and is expensive to replace; so if you don't feel confident about installing it yourself, ask your Authorized EPSON Servicer for assistance. If your computer already has a memory module installed on the board, and you want to replace it with a higher-capacity module, you need to remove the original memory module. Follow these steps: 1. Remove the keyboard as described on pages 4-13 to 4-15. 4-16 Installing Optional Devices
-
 1
1 -
2
-
3
-
4
-
5
-
6
-
7
-
8
-
9
-
10
-
11
-
12
-
13
-
14
-
15
-
16
-
17
-
18
-
19
-
20
-
21
-
22
-
23
-
24
-
25
-
26
-
27
-
28
-
29
-
30
-
31
-
32
-
33
-
34
-
35
-
36
-
37
-
38
-
39
-
40
-
41
-
42
-
43
-
44
-
45
-
46
-
47
-
48
-
49
-
50
-
51
-
52
-
53
-
54
-
55
-
56
-
57
-
58
-
59
-
60
-
61
-
62
-
63
-
64
-
65
-
66
-
67
-
68
-
69
-
70
-
71
-
72
-
73
-
74
-
75
-
76
-
77
-
78
-
79
-
 80
80 -
 81
81 -
 82
82 -
 83
83 -
 84
84 -
 85
85 -
 86
86 -
 87
87 -
 88
88 -
 89
89 -
 90
90 -
91
-
92
-
93
-
94
-
95
-
96
-
97
-
98
-
99
-
100
-
101
-
102
-
103
-
104
-
105
-
106
-
107
-
108
-
109
-
110
-
111
-
112
-
113
-
114
-
115
-
116
-
117
-
118
-
119
-
120
-
121
-
122
-
123
-
124
-
125
-
126
-
127
-
128
-
129
-
130
-
131
-
132
-
133
-
134
-
135
-
136
-
137
-
138
-
139
 |
 |
