Epson ActionNote 910C User Manual - Page 40
Insert the drive and card into the drive, The hard disk drive compartment on your
 |
View all Epson ActionNote 910C manuals
Add to My Manuals
Save this manual to your list of manuals |
Page 40 highlights
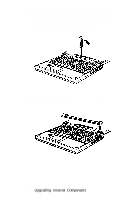
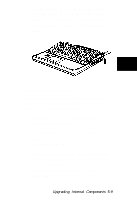
The hard disk drive compartment on your ActionNote can accommodate IDE standard drives up to 19 mm high. If the drive that came with your computer is less than 19 mm high, it is installed above a black foam spacer. If you are going to install a 19 mm drive, remove the spacer from the compartment before you perform step 3. 3. Insert the drive and card into the drive compartment, aligning the connector on the card with the pins in the compartment. Press down on the metal tabs until the drive is fully seated. Upgrading Internal Components 5-5
-
 1
1 -
2
-
3
-
4
-
5
-
6
-
7
-
8
-
9
-
10
-
11
-
12
-
13
-
14
-
15
-
16
-
17
-
18
-
19
-
20
-
21
-
22
-
23
-
24
-
25
-
26
-
27
-
28
-
29
-
30
-
31
-
32
-
33
-
34
-
 35
35 -
 36
36 -
 37
37 -
 38
38 -
 39
39 -
 40
40 -
 41
41 -
 42
42 -
 43
43 -
 44
44 -
 45
45 -
46
-
47
-
48
-
49
-
50
-
51
-
52
-
53
-
54
-
55
-
56
-
57
-
58
-
59
-
60
-
61
-
62
-
63
-
64
-
65
-
66
-
67
-
68
-
69
-
70
-
71
-
72
-
73
-
74
-
75
-
76
-
77
-
78
-
79
-
80
-
81
-
82
-
83
-
84
-
85
-
86
-
87
-
88
-
89
-
90
-
91
-
92
-
93
-
94
-
95
-
96
-
97
-
98
-
99
-
100
-
101
 |
 |

The hard disk drive compartment on your
ActionNote can accommodate
IDE
standard drives up to 19 mm high. If the
drive that came with your computer is
less than 19 mm high, it is installed above
a black foam spacer. If you are going to
install a 19 mm drive, remove the spacer
from the compartment before you
perform step 3.
3.
Insert the drive and card into the drive
compartment, aligning the connector on
the card with the pins in the compart-
ment. Press down on the metal tabs until
the drive is fully seated.
Upgrading Internal
Components 5-5