Epson ActionNote 910C User Manual - Page 42
Removing and Replacing the Keyboard, Removing the Keyboard, the Keyboard
 |
View all Epson ActionNote 910C manuals
Add to My Manuals
Save this manual to your list of manuals |
Page 42 highlights
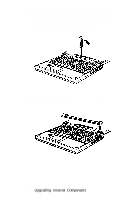
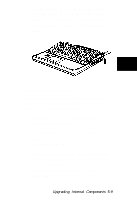
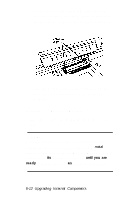
Removing and Replacing the Keyboard You need to remove the keyboard to install memory. However, you don't need to disconnect the keyboard cables. Removing the Keyboard Follow these steps to remove the keyboard 1. Turn off the computer and disconnect the AC power adapter. 2. Disconnect any attached external devices and cables. 3. Open the screen as wide as you can. 4. Remove the plastic caps on both sides of the case below the screen. Use a small screwdriver to pry each cap loose and then slide it off, as shown. Upgrading Internal Components 5-7
-
 1
1 -
2
-
3
-
4
-
5
-
6
-
7
-
8
-
9
-
10
-
11
-
12
-
13
-
14
-
15
-
16
-
17
-
18
-
19
-
20
-
21
-
22
-
23
-
24
-
25
-
26
-
27
-
28
-
29
-
30
-
31
-
32
-
33
-
34
-
35
-
36
-
 37
37 -
 38
38 -
 39
39 -
 40
40 -
 41
41 -
 42
42 -
 43
43 -
 44
44 -
 45
45 -
 46
46 -
 47
47 -
48
-
49
-
50
-
51
-
52
-
53
-
54
-
55
-
56
-
57
-
58
-
59
-
60
-
61
-
62
-
63
-
64
-
65
-
66
-
67
-
68
-
69
-
70
-
71
-
72
-
73
-
74
-
75
-
76
-
77
-
78
-
79
-
80
-
81
-
82
-
83
-
84
-
85
-
86
-
87
-
88
-
89
-
90
-
91
-
92
-
93
-
94
-
95
-
96
-
97
-
98
-
99
-
100
-
101
 |
 |

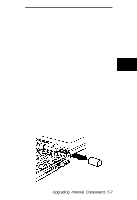
Removing and Replacing
the Keyboard
You need to remove the keyboard to install
memory. However, you don’t need to
disconnect the keyboard cables.
Removing the Keyboard
Follow these steps to remove the keyboard
1.
Turn off the computer and disconnect the
AC power adapter.
2.
Disconnect any attached external devices
and cables.
3.
Open the screen as wide as you can.
4.
Remove the plastic caps on both sides of
the case below the screen. Use a small
screwdriver to pry each cap loose and
then slide it off, as shown.
Upgrading Internal Components 5-7