Epson FX-85 User Manual - Page 80
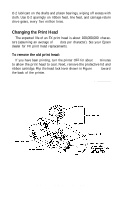
To install the new print head, block. That's all there is to
 |
View all Epson FX-85 manuals
Add to My Manuals
Save this manual to your list of manuals |
Page 80 highlights
Now pull the cable from the connector block. Hold the block firmly because it has to stay put. Pull the print head straight up and off. To install the new print head: Place the new print head onto the head mount and flip the locking lever back toward the front of the printer. Connect the cable to the block. That's all there is to it! 325
-
 1
1 -
2
-
3
-
4
-
5
-
6
-
7
-
8
-
9
-
10
-
11
-
12
-
13
-
14
-
15
-
16
-
17
-
18
-
19
-
20
-
21
-
22
-
23
-
24
-
25
-
26
-
27
-
28
-
29
-
30
-
31
-
32
-
33
-
34
-
35
-
36
-
37
-
38
-
39
-
40
-
41
-
42
-
43
-
44
-
45
-
46
-
47
-
48
-
49
-
50
-
51
-
52
-
53
-
54
-
55
-
56
-
57
-
58
-
59
-
60
-
61
-
62
-
63
-
64
-
65
-
66
-
67
-
68
-
69
-
70
-
71
-
72
-
73
-
74
-
 75
75 -
 76
76 -
 77
77 -
 78
78 -
 79
79 -
 80
80 -
 81
81 -
 82
82 -
 83
83 -
 84
84 -
 85
85 -
86
-
87
-
88
-
89
-
90
-
91
-
92
-
93
-
94
-
95
-
96
-
97
-
98
-
99
-
100
-
101
-
102
-
103
-
104
-
105
-
106
-
107
-
108
 |
 |

Now pull the cable from the connector block. Hold the block firmly
because it has to stay put. Pull the print head straight up and off.
To install the new print head:
Place the new print head onto the head mount and flip the locking
lever back toward the front of the printer. Connect the cable to the
block. That’s all there is to it!
325