Epson Stylus Photo 1200 User Manual - Page 54
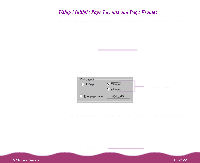
Normal, Fit to Custom, Scale to, Using Multiple Layouts, and Frames
 |
View all Epson Stylus Photo 1200 manuals
Add to My Manuals
Save this manual to your list of manuals |
Page 54 highlights
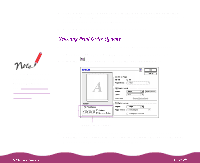
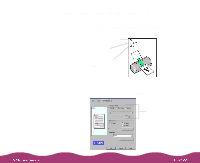
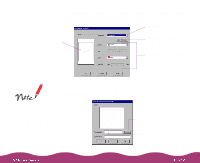
If you previously selected a Paper Size setting that is larger than the maximum paper size for your printer and then choose Normal, the Paper Size changes to Letter 8 1/2 × 11 in. 6 Select one of the following Reduce/Enlarge settings: Select Normal to set the print proportion to 100%. Select Fit to Page to automatically reduce or enlarge the document to fit on the paper size loaded in the printer. The Paper Size option beneath the Fit to Page setting becomes active; if necessary, select the size of paper loaded in the printer. Select Fit to Page, then select the size of paper loaded in the printer Select Custom, then select a percentage (10% to 400%) in the Scale to field to reduce or enlarge the document by a specific amount. 7 If you're finished selecting Layout options, click OK. If you want to select more options, see Using Multiple Page Layouts and Page Frames and Adding a Watermark.
-
 1
1 -
2
-
3
-
4
-
5
-
6
-
7
-
8
-
9
-
10
-
11
-
12
-
13
-
14
-
15
-
16
-
17
-
18
-
19
-
20
-
21
-
22
-
23
-
24
-
25
-
26
-
27
-
28
-
29
-
30
-
31
-
32
-
33
-
34
-
35
-
36
-
37
-
38
-
39
-
40
-
41
-
42
-
43
-
44
-
45
-
46
-
47
-
48
-
 49
49 -
 50
50 -
 51
51 -
 52
52 -
 53
53 -
 54
54 -
 55
55 -
 56
56 -
 57
57 -
 58
58 -
 59
59 -
60
-
61
-
62
-
63
-
64
-
65
-
66
-
67
-
68
-
69
-
70
-
71
-
72
-
73
-
74
-
75
-
76
-
77
-
78
-
79
-
80
-
81
-
82
-
83
-
84
-
85
-
86
-
87
-
88
-
89
-
90
-
91
-
92
-
93
-
94
-
95
-
96
-
97
-
98
-
99
-
100
-
101
-
102
-
103
-
104
-
105
-
106
-
107
-
108
-
109
-
110
-
111
-
112
-
113
-
114
-
115
-
116
-
117
-
118
-
119
-
120
-
121
-
122
-
123
-
124
-
125
-
126
-
127
-
128
-
129
-
130
-
131
-
132
-
133
-
134
-
135
-
136
-
137
-
138
-
139
-
140
-
141
-
142
-
143
-
144
-
145
-
146
-
147
-
148
-
149
-
150
-
151
-
152
-
153
-
154
-
155
-
156
-
157
-
158
-
159
-
160
-
161
-
162
-
163
-
164
-
165
-
166
-
167
-
168
 |
 |
