Epson WorkForce WF-2650 User Manual - Page 47
Repeat steps 1 to 4 to tape Sheet 3 and Sheet 4 together., Tape the sheets together from the back.
 |
View all Epson WorkForce WF-2650 manuals
Add to My Manuals
Save this manual to your list of manuals |
Page 47 highlights
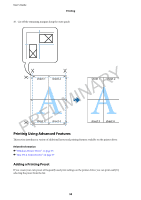
User's Guide Printing 3. Cut the taped sheets in two along the vertical red line through the alignment markers (this time, the line to the left of the cross marks). PRELIMINARY 4. Tapethesheetstogetherfromtheback. 5. Repeat steps 1 to 4 to tape Sheet 3 and Sheet 4 together. 47
-
 1
1 -
2
-
3
-
4
-
5
-
6
-
7
-
8
-
9
-
10
-
11
-
12
-
13
-
14
-
15
-
16
-
17
-
18
-
19
-
20
-
21
-
22
-
23
-
24
-
25
-
26
-
27
-
28
-
29
-
30
-
31
-
32
-
33
-
34
-
35
-
36
-
37
-
38
-
39
-
40
-
41
-
 42
42 -
 43
43 -
 44
44 -
 45
45 -
 46
46 -
 47
47 -
 48
48 -
 49
49 -
 50
50 -
 51
51 -
 52
52 -
53
-
54
-
55
-
56
-
57
-
58
-
59
-
60
-
61
-
62
-
63
-
64
-
65
-
66
-
67
-
68
-
69
-
70
-
71
-
72
-
73
-
74
-
75
-
76
-
77
-
78
-
79
-
80
-
81
-
82
-
83
-
84
-
85
-
86
-
87
-
88
-
89
-
90
-
91
-
92
-
93
-
94
-
95
-
96
-
97
-
98
-
99
-
100
-
101
-
102
-
103
-
104
-
105
-
106
-
107
-
108
-
109
-
110
-
111
-
112
-
113
-
114
-
115
-
116
-
117
-
118
-
119
-
120
-
121
-
122
-
123
-
124
-
125
-
126
-
127
-
128
-
129
-
130
-
131
-
132
-
133
-
134
-
135
-
136
-
137
 |
 |

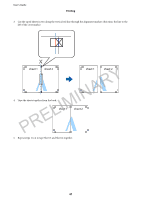
3.
Cut the taped sheets in two along the vertical red line through the alignment markers (this time, the line to the
leſt of the cross marks).
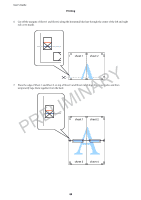
4.
Tape the sheets together from the back.
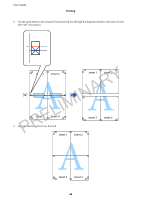
5.
Repeat steps 1 to 4 to tape Sheet 3 and Sheet 4 together.
User's Guide
Printing
47
PRELIMINARY