Epson WorkForce WF-2650 User Manual - Page 85
Temporarily Printing with Black Ink - Mac OS X, Related Information, Replacing Ink Cartridges
 |
View all Epson WorkForce WF-2650 manuals
Add to My Manuals
Save this manual to your list of manuals |
Page 85 highlights
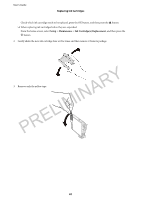
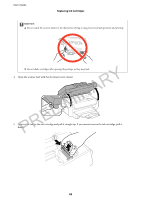
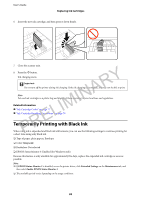
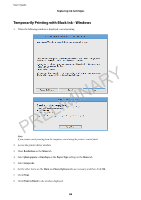
User's Guide Replacing Ink Cartridges Related Information & "Loading Paper in the Paper Cassette" on page 27 & "Printing Basics - Windows" on page 36 Temporarily Printing with Black Ink - Mac OS X Note: To use this feature through a network, connect with Bonjour. 1. Click the printer icon in the Dock. 2. Cancel the job. ❏ Mac OS X v10.8.x to Mac OS X v10.9.x 3. 4. 5. 6. 7. 8. 9. PRELIMINARY Click next to the progress meter. ❏ Mac OS X v10.6.x to v10.7.x Click Delete. Note: If you cannot cancel printing from the computer, cancel using the printer's control panel. Select System Preferences from the menu > Printers & Scanners (or Print & Scan, Print & Fax), and then select the printer. Click Options & Supplies > Options (or Driver). Select On as the Permit temporary black printing setting. Access the print dialog. Select Print Settings from the pop-up menu. Select any paper size except for a borderless size as the Paper Size setting. Select plain papers or Envelope as the Media Type setting. Select Grayscale. 10. Set the other items as necessary. 11. Click Print. Related Information & "Loading Paper in the Paper Cassette" on page 27 & "Printing Basics - Mac OS X" on page 37 85
-
 1
1 -
2
-
3
-
4
-
5
-
6
-
7
-
8
-
9
-
10
-
11
-
12
-
13
-
14
-
15
-
16
-
17
-
18
-
19
-
20
-
21
-
22
-
23
-
24
-
25
-
26
-
27
-
28
-
29
-
30
-
31
-
32
-
33
-
34
-
35
-
36
-
37
-
38
-
39
-
40
-
41
-
42
-
43
-
44
-
45
-
46
-
47
-
48
-
49
-
50
-
51
-
52
-
53
-
54
-
55
-
56
-
57
-
58
-
59
-
60
-
61
-
62
-
63
-
64
-
65
-
66
-
67
-
68
-
69
-
70
-
71
-
72
-
73
-
74
-
75
-
76
-
77
-
78
-
79
-
 80
80 -
 81
81 -
 82
82 -
 83
83 -
 84
84 -
 85
85 -
 86
86 -
 87
87 -
 88
88 -
 89
89 -
 90
90 -
91
-
92
-
93
-
94
-
95
-
96
-
97
-
98
-
99
-
100
-
101
-
102
-
103
-
104
-
105
-
106
-
107
-
108
-
109
-
110
-
111
-
112
-
113
-
114
-
115
-
116
-
117
-
118
-
119
-
120
-
121
-
122
-
123
-
124
-
125
-
126
-
127
-
128
-
129
-
130
-
131
-
132
-
133
-
134
-
135
-
136
-
137
 |
 |
