Foxconn FlamingBlade GTI English Manual. - Page 110
Install a New Windows XP
 |
View all Foxconn FlamingBlade GTI manuals
Add to My Manuals
Save this manual to your list of manuals |
Page 110 highlights
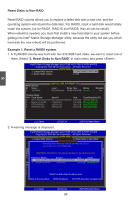
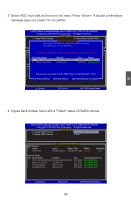
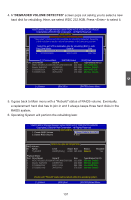
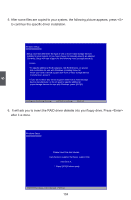
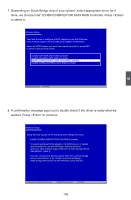
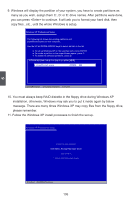
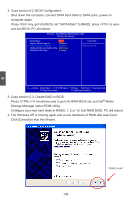
CAUTION 5-4 Install a New Windows XP ! When you set the SATA Mode in BIOS to either AHCI or RAID, you need to follow these steps to install your Windows XP system. 1. Press to enter BIOS Setup during POST. 2. Insert the Windows installation CD into the optical drive. 3. Set the "1st Boot Device" to "CDROM", save changes and exit the BIOS setup. Phoenix - AwardBIOS CMOS Setup Utility Boot Setting Configuration ► HDD Boot Priority ► Removable Boot Priority 1st Boot Device 2nd Boot Device 3rd Boot Device Boot Other Devices Boot Up NumLock Status Gate A20 Option Security Option APIC Mode MPS Version Control For OS OS Select For DRAM > 64MB Report No FDD For WIN 95 HDD Detection Delay (s) Display Full Screen Logo Display Quantum Logo Display Summary Screen Debug Code Control System BIOS Cacheable Press Enter Item Help Press Enter CDROM Menu Level ► Hard Disk Removable Select Hard Disk Boot Enabled Device Priority On Fast Setup Enabled 1.4 Non-OS2 No 0 Enabled Enabled Disabled LPC Enabled Move Enter:Select +/-/PU/PD:Value F10:Save ESC:Exit F1:General Help F5:Previous Values F7:Optimized Defaults 4. The computer will reboot, and it will start installing Windows Operating System. Watch the screen carefully, when the following picture appears, press key immediately. If you forgot to do this, PC will go to an fatal blue screen, and you may need to reboot the system again. PC may not respond to your input immediately, and it keeps loading files until the next screen displays. Windows Setup 5 Press F6 if you need to install a 3rd party SCSI or RAID driver. 103
-
 1
1 -
2
-
3
-
4
-
5
-
6
-
7
-
8
-
9
-
10
-
11
-
12
-
13
-
14
-
15
-
16
-
17
-
18
-
19
-
20
-
21
-
22
-
23
-
24
-
25
-
26
-
27
-
28
-
29
-
30
-
31
-
32
-
33
-
34
-
35
-
36
-
37
-
38
-
39
-
40
-
41
-
42
-
43
-
44
-
45
-
46
-
47
-
48
-
49
-
50
-
51
-
52
-
53
-
54
-
55
-
56
-
57
-
58
-
59
-
60
-
61
-
62
-
63
-
64
-
65
-
66
-
67
-
68
-
69
-
70
-
71
-
72
-
73
-
74
-
75
-
76
-
77
-
78
-
79
-
80
-
81
-
82
-
83
-
84
-
85
-
86
-
87
-
88
-
89
-
90
-
91
-
92
-
93
-
94
-
95
-
96
-
97
-
98
-
99
-
100
-
101
-
102
-
103
-
104
-
 105
105 -
 106
106 -
 107
107 -
 108
108 -
 109
109 -
 110
110 -
 111
111 -
 112
112 -
 113
113 -
 114
114 -
 115
115 -
116
-
117
-
118
-
119
-
120
-
121
-
122
 |
 |