Foxconn FlamingBlade GTI English Manual. - Page 86
BIOS Configuration
 |
View all Foxconn FlamingBlade GTI manuals
Add to My Manuals
Save this manual to your list of manuals |
Page 86 highlights
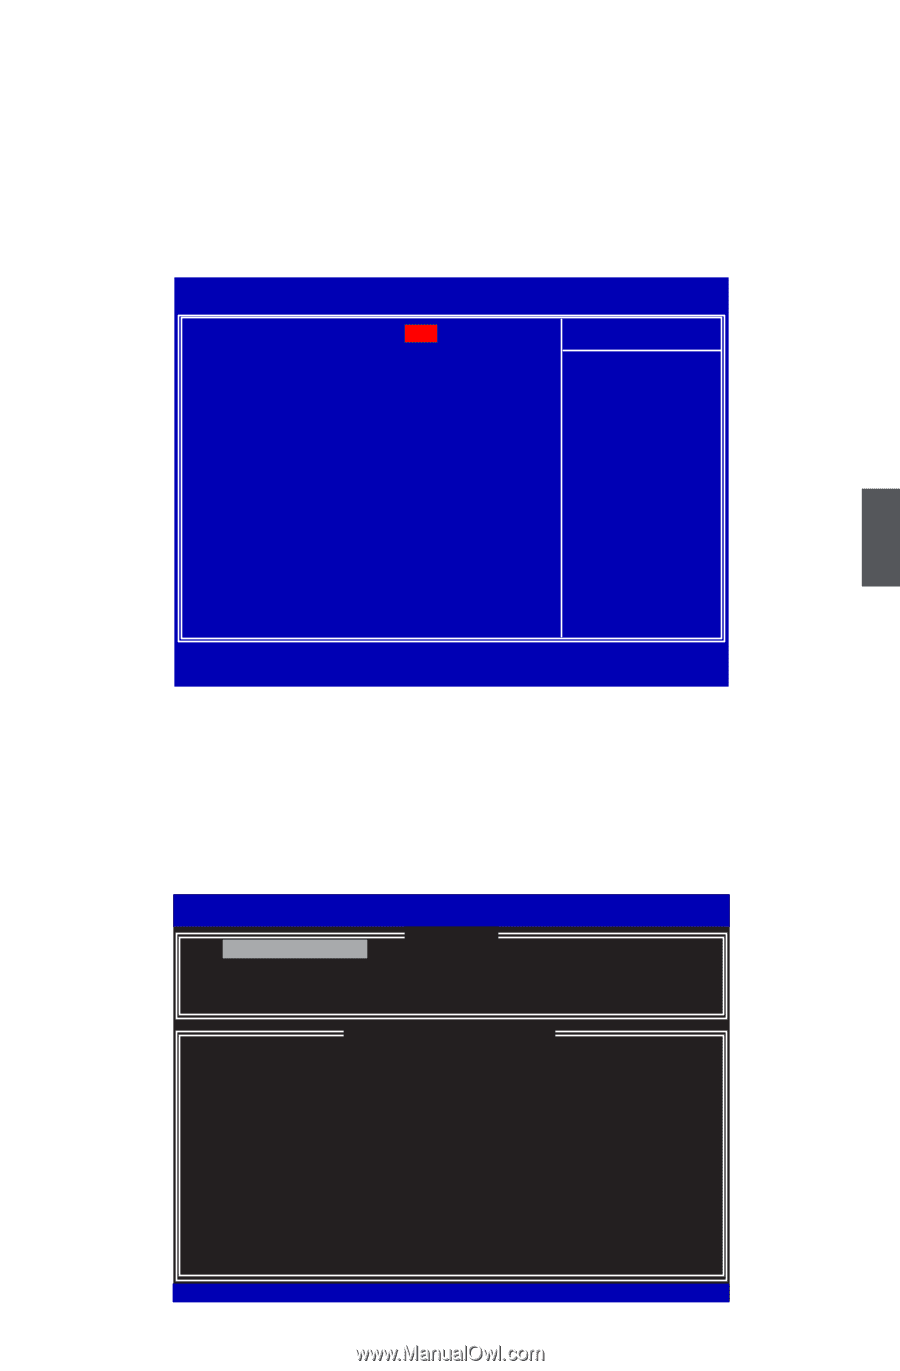
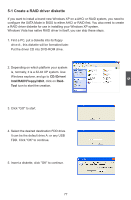
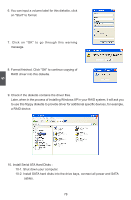
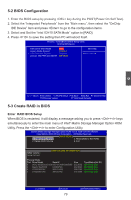
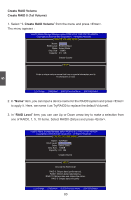
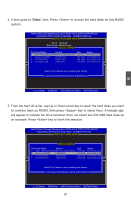
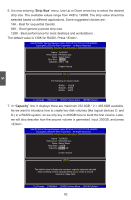
5-2 BIOS Configuration 1. Enter the BIOS setup by pressing key during the POST(Power On Self Test). 2. Select the "Integrated Peripherals" from the "Main menu", then select the "OnChip IDE Device" item and press to go to the configuration items. 3. Select and Set the "Intel ICH10 SATA Mode" option to [RAID]. 4. Press to save the setting then PC will reboot itself. Phoenix - AwardBIOS CMOS Setup Utility OnChip IDE Device Intel ICH10 SATA Mode R AID Item Help Legacy Mode Support Disabled x Turbo Memory Support Disabled Menu Level ► Jmicron 363 PATA and eSATA IDE Mode 5 Move Enter:Select +/-/PU/PD:Value F10:Save ESC:Exit F1:General Help F5:Previous Values F7:Optimized Defaults 5-3 Create RAID in BIOS Enter RAID BIOS Setup When BIOS is restarted, it will display a message asking you to press + keys simultaneously to enter the main menu of Intel® Matrix Storage Manager Option ROM Utility. Press the + to enter Configuration Utility. IInntteell((RR)) MMaattrriixx SSttoorraaggee MMaannaaggeerr ooppttiioonn RROOMM vv85..00..00..11003191 ICH190RRwwRRAAIDID55 CCooppyyrriigghhtt((CC)) 22000033--0084 IInntteell CCoorrppoorraattiioonn. AAll lRl RigihgthstsRReseesrevrevde.d. [ MAIN MENU ] 1. Create RAID Volume 3. Reset Disks to Non-RAID 2. Delete RAID Volume 4. Exit [ DISK/VOLUME INFORMATION ] RAID Volume : None Defined. Physical Disks: Port Drive Model Serial # Size 0 WDC WD2500JS-60N WD-WCANKC865380 232.9GB 2 Maxtor 6L250S0 L50SKP4G 232.9GB 4 ST3320620SV 9QF4YJGQ 298.1GB 5 ST3300831AS 3NF02XH2 279.5GB Type/Status(Vol ID) Non-RAID Disk Non-RAID Disk Non-RAID Disk Non-RAID Disk [↑↓]-Select [ESC]-Exit 79 [ENTER]-Select Menu
-
 1
1 -
2
-
3
-
4
-
5
-
6
-
7
-
8
-
9
-
10
-
11
-
12
-
13
-
14
-
15
-
16
-
17
-
18
-
19
-
20
-
21
-
22
-
23
-
24
-
25
-
26
-
27
-
28
-
29
-
30
-
31
-
32
-
33
-
34
-
35
-
36
-
37
-
38
-
39
-
40
-
41
-
42
-
43
-
44
-
45
-
46
-
47
-
48
-
49
-
50
-
51
-
52
-
53
-
54
-
55
-
56
-
57
-
58
-
59
-
60
-
61
-
62
-
63
-
64
-
65
-
66
-
67
-
68
-
69
-
70
-
71
-
72
-
73
-
74
-
75
-
76
-
77
-
78
-
79
-
80
-
 81
81 -
 82
82 -
 83
83 -
 84
84 -
 85
85 -
 86
86 -
 87
87 -
 88
88 -
 89
89 -
 90
90 -
 91
91 -
92
-
93
-
94
-
95
-
96
-
97
-
98
-
99
-
100
-
101
-
102
-
103
-
104
-
105
-
106
-
107
-
108
-
109
-
110
-
111
-
112
-
113
-
114
-
115
-
116
-
117
-
118
-
119
-
120
-
121
-
122
 |
 |