Foxconn FlamingBlade GTI English Manual. - Page 33
Standard CMOS Features - to flaming blade bios
 |
View all Foxconn FlamingBlade GTI manuals
Add to My Manuals
Save this manual to your list of manuals |
Page 33 highlights
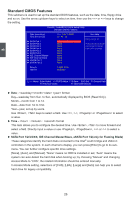
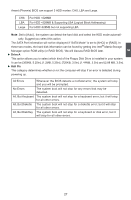
3 Standard CMOS Features This submenu is used to set up the standard BIOS features, such as the date, time, floppy drive and so on. Use the arrow up/down keys to select an item, then use the or keys to change the setting. Phoenix - AwardBIOS CMOS Setup Utility Standard CMOS Features Date (mm:dd:yy) Wed, Feb 11 2009 Item Help Time (hh:mm:ss) 17 : 44 : 13 Menu Level ► ► SATA Port 1 WWDDCC WD2500JS-60NCB1 ► SATA Port 2 None Press [Enter] to enter ► SATA Port 3 None next page for detail ► SATA Port 4 None hard drive settings ► SATA Port 5 None ► SATA Port 6 None ► IDE Channel Master None ► IDE Channel Slave None ► eSATA Port 1 None ► eSATA Port 2 None Drive A 1.44M, 3.5 in. Halt On All Errors Move Enter:Select +/-/PU/PD:Value F10:Save ESC:Exit F1:General Help F5:Previous Values F7:Optimized Defaults ► Date - format Day-weekday from Sun. to Sat., automatically displayed by BIOS (Read Only). Month-month from 1 to 12. Date-date from 1st to 31st. Year-year, set up by users. Use , keys to select a field. Use , , or to select a value. ► Time - : : format This item allows you to configure the desired time. Use , to move forward and select a field. Directly input a value or use , , or to select a value. ► SATA Port 1/2/3/4/5/6, IDE Channel Master/Slave, eSATA Port 1/2(only for Flaming Blade) These categories identify the hard disks connected to the Intel® south bridge and JMicron controllers in the system. In each channel's display, you can press [Enter] to go to its submenu. You can further configure specific drive settings. [None], [Auto], and [Manual]. "None" means no HDD is installed or set; "Auto" means the system can auto-detect the hard disk when booting up; by choosing "Manual" and changing Access Mode to "CHS", the related information should be entered manually. In Access Mode setting, selections of [CHS], [LBA], [Large] and [Auto] can help you to select hard drive for legacy compatibility. 26
-
 1
1 -
2
-
3
-
4
-
5
-
6
-
7
-
8
-
9
-
10
-
11
-
12
-
13
-
14
-
15
-
16
-
17
-
18
-
19
-
20
-
21
-
22
-
23
-
24
-
25
-
26
-
27
-
 28
28 -
 29
29 -
 30
30 -
 31
31 -
 32
32 -
 33
33 -
 34
34 -
 35
35 -
 36
36 -
 37
37 -
 38
38 -
39
-
40
-
41
-
42
-
43
-
44
-
45
-
46
-
47
-
48
-
49
-
50
-
51
-
52
-
53
-
54
-
55
-
56
-
57
-
58
-
59
-
60
-
61
-
62
-
63
-
64
-
65
-
66
-
67
-
68
-
69
-
70
-
71
-
72
-
73
-
74
-
75
-
76
-
77
-
78
-
79
-
80
-
81
-
82
-
83
-
84
-
85
-
86
-
87
-
88
-
89
-
90
-
91
-
92
-
93
-
94
-
95
-
96
-
97
-
98
-
99
-
100
-
101
-
102
-
103
-
104
-
105
-
106
-
107
-
108
-
109
-
110
-
111
-
112
-
113
-
114
-
115
-
116
-
117
-
118
-
119
-
120
-
121
-
122
 |
 |