Garmin GPSMAP 4210 Owner's Manual - Page 50
Radar Targeting, Radar, Enable Guard Zone, Adjust, Guard Zone, Corner 1, Rocker, Circular
 |
View all Garmin GPSMAP 4210 manuals
Add to My Manuals
Save this manual to your list of manuals |
Page 50 highlights
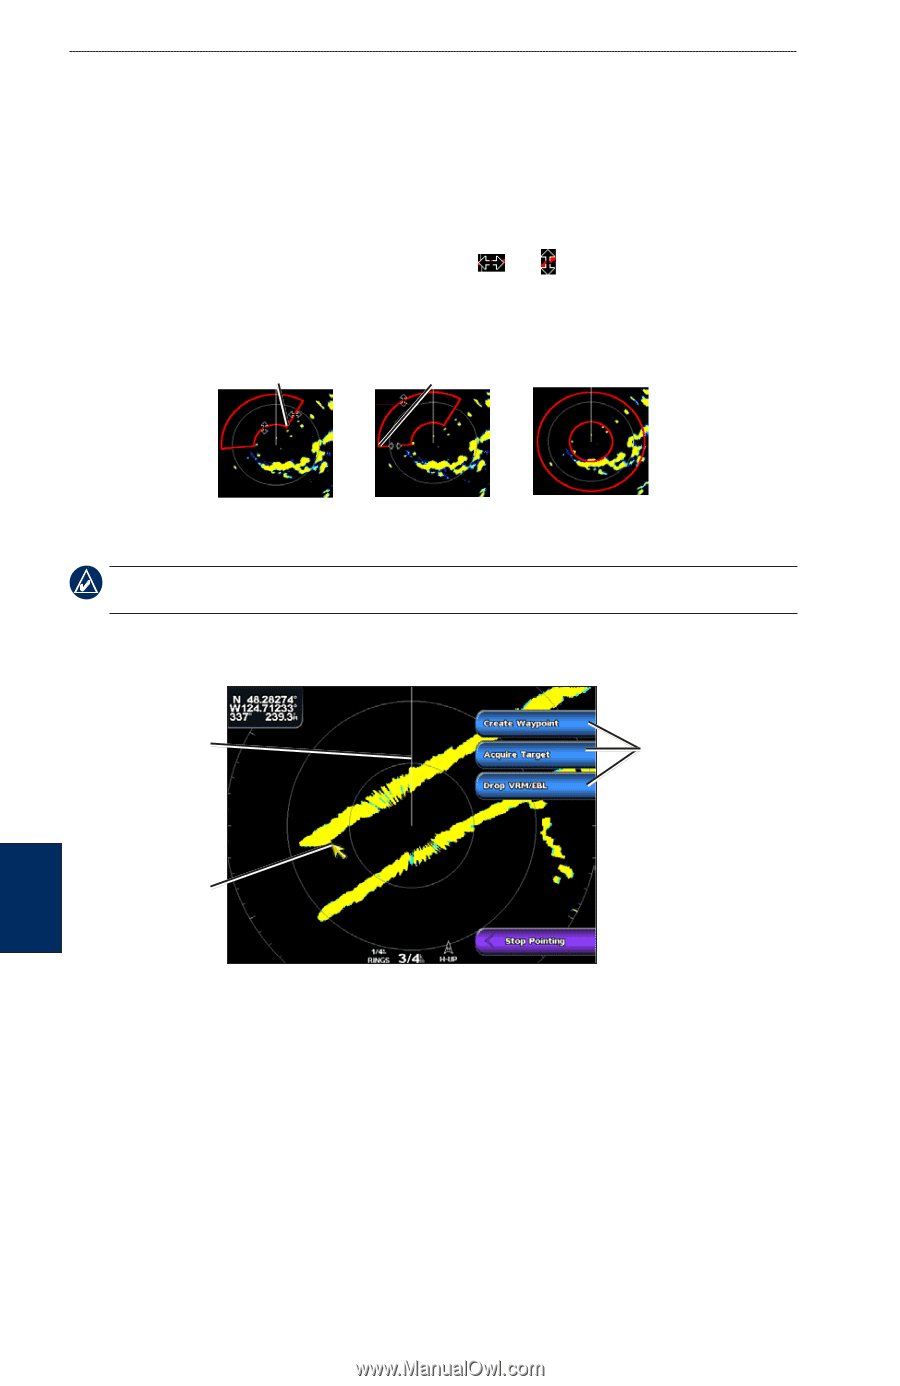
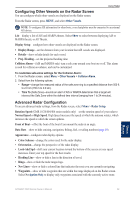
Using Radar To enable the guard zone: From the Home screen, select Radar > Sentry > Menu > Sentry Setup > Enable Guard Zone. To adjust the guard zone boundaries: 1. While the guard zone is on, from the Radar screen, select Menu > Sentry Setup > Adjust Guard Zone > Move Guard Zone. 2. Select an option: • Corner 1 (and Corner 2): Defines a guard zone that does not completely encompass the boat. Use the Rocker as indicated by the arrows ( and ) to define the size of the guard zone. Use Corner 1 or Corner 2 to change the reference point. • Circular: Joins the guard zone to completely encompass the boat. Use Corner 1 or Corner 2 to adjust the size. Corner 1 Corner 2 Circular Radar Targeting Note: MARPA requires the use of a heading sensor. The heading sensor must output the NMEA 0183 sentence HDM or HDG. 1. From the Radar screen, use the Rocker to begin targeting. As you move the target over objects on the radar, target options appear along the right side of the screen. Heading line Target options Target Cruising Screen - Targeting 2. Select an option: • Select Create Waypoint to mark a waypoint at the targeted object or location. • Select Acquire Target to assign a Mini Automatic Radar Plotting Aid (MARPA) tag to the targeted object. • Select Drop VRM/EBL to set the Variable Range Marker (VRM) and Electronic Bearing Line (EBL) to measure range and bearing to a target. Using Radar 46 GPSMAP 4000 Series Owner's Manual
-
 1
1 -
2
-
3
-
4
-
5
-
6
-
7
-
8
-
9
-
10
-
11
-
12
-
13
-
14
-
15
-
16
-
17
-
18
-
19
-
20
-
21
-
22
-
23
-
24
-
25
-
26
-
27
-
28
-
29
-
30
-
31
-
32
-
33
-
34
-
35
-
36
-
37
-
38
-
39
-
40
-
41
-
42
-
43
-
44
-
 45
45 -
 46
46 -
 47
47 -
 48
48 -
 49
49 -
 50
50 -
 51
51 -
 52
52 -
 53
53 -
 54
54 -
 55
55 -
56
-
57
-
58
-
59
-
60
-
61
-
62
-
63
-
64
-
65
-
66
-
67
-
68
-
69
-
70
-
71
-
72
-
73
-
74
-
75
-
76
-
77
-
78
-
79
-
80
-
81
-
82
-
83
-
84
 |
 |