Garmin iQue 3000 Operating Instructions - Page 107
Network Preferences
 |
UPC - 753759049812
View all Garmin iQue 3000 manuals
Add to My Manuals
Save this manual to your list of manuals |
Page 107 highlights
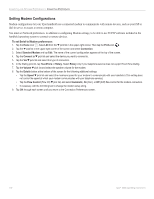
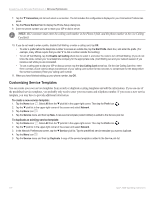
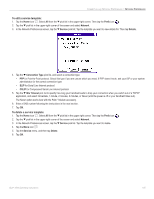
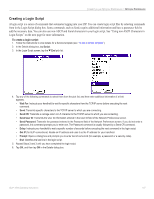
CONNECTION AND NETWORK PREFERENCES > NETWORK PREFERENCES Network Preferences You must set Network preferences and Connection preferences to use the TCP/IP software included in the handheld operating system for remote connections. Network preferences let you set a password, telephone number, DNS number, IP address, as well as create a login script for remote connections. You can use a preset service template for your ISP or dial-in server and edit, save, and reuse settings. You can also create your own service template. To set network preferences: 1. Tap the Home icon . Select All from the pick list in the upper-right corner. Then tap the Prefs icon . 2. Tap the pick list in the upper-right corner of the screen and select Network. 3. Tap the Service pick list. Tap the predefined service template you want to use. 4. Tap the User Name field. Only two lines appear on the screen, but the field can contain multiple lines of text. 5. Enter your user name that identifies you on logging in to your ISP or dial-in server. Do not enter spaces in your user name unless your dial-in server accepts them. 6. Choose whether to use a password when logging onto your ISP or dial-up service: • To save your password for use during log-on, tap the Password field. Enter your password and tap OK. "Assigned" appears in the field. • To have your iQue prompt you for the password during log-on, leave "Prompt" in the Password field and do not enter anything. You should choose this option if you are concerned about security. (Continued on next page.) iQue® 3000 Operating Instructions 103
-
 1
1 -
2
-
3
-
4
-
5
-
6
-
7
-
8
-
9
-
10
-
11
-
12
-
13
-
14
-
15
-
16
-
17
-
18
-
19
-
20
-
21
-
22
-
23
-
24
-
25
-
26
-
27
-
28
-
29
-
30
-
31
-
32
-
33
-
34
-
35
-
36
-
37
-
38
-
39
-
40
-
41
-
42
-
43
-
44
-
45
-
46
-
47
-
48
-
49
-
50
-
51
-
52
-
53
-
54
-
55
-
56
-
57
-
58
-
59
-
60
-
61
-
62
-
63
-
64
-
65
-
66
-
67
-
68
-
69
-
70
-
71
-
72
-
73
-
74
-
75
-
76
-
77
-
78
-
79
-
80
-
81
-
82
-
83
-
84
-
85
-
86
-
87
-
88
-
89
-
90
-
91
-
92
-
93
-
94
-
95
-
96
-
97
-
98
-
99
-
100
-
101
-
 102
102 -
 103
103 -
 104
104 -
 105
105 -
 106
106 -
 107
107 -
 108
108 -
 109
109 -
 110
110 -
 111
111 -
 112
112 -
113
-
114
-
115
-
116
-
117
-
118
-
119
-
120
 |
 |
