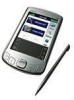
Garmin iQue 3000 Operating Instructions - Page 7
Locating Side, Top, Bottom and Back Panel Components, Power/Backlight Button, Power, Stylus - software
 |
UPC - 753759049812
View all Garmin iQue 3000 manuals
Add to My Manuals
Save this manual to your list of manuals |
Page 7 highlights
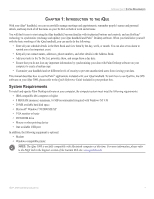
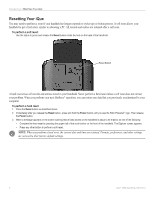
INTRODUCTION > IQUE COMPONENTS Headphones jack Power/Backlight Button GPS antenna (in down position) Stylus Slots for leather flip cover Expansion card slot IR port Top View External antenna connector AC charger connector Interface connector Bottom View Locating Side, Top, Bottom and Back Panel Components • Power/Backlight Button: Pressing the Power button turns the handheld on or off. When you turn on the handheld, the page displayed most previously appears. The LED is amber when the unit is charging and turns green when the unit is fully charged. Press and hold the Power button for about two seconds to turn the backlight on or off for changing lighting conditions. You may also assign the full-screen pen stroke to activate the backlight. For more information, see "To change what the full-screen pen stroke activates" in Chapter 3. • Stylus: Use to tap icons and buttons on the screen or enter data on the Graffiti® 2 writing area. To use the stylus, remove it from the side channel and hold it as you would a pen or pencil. • External Antenna Connector: Accepts a Garmin low profile remote antenna. • IR Port: Uses infrared technology to transmit and receive data to and from other iQue or Palm OS® handhelds and to perform HotSync® operations. See "Beaming Information" in Chapter 8 and "IR HotSync Operations" in Chapter 9 for more information. • Expansion Card Slot: Accepts microSD expansion cards for flexible memory storage and additional software. • Headphones Jack: Plug in headphones for listening to MP3 audio files or navigation guidance. • AC Charger Connector: Connects to the AC wall charger for battery recharge only. • Interface Connector: Connects your handheld to your computer. iQue® 3000 Operating Instructions 3
-
 1
1 -
 2
2 -
 3
3 -
 4
4 -
 5
5 -
 6
6 -
 7
7 -
 8
8 -
 9
9 -
 10
10 -
 11
11 -
 12
12 -
13
-
14
-
15
-
16
-
17
-
18
-
19
-
20
-
21
-
22
-
23
-
24
-
25
-
26
-
27
-
28
-
29
-
30
-
31
-
32
-
33
-
34
-
35
-
36
-
37
-
38
-
39
-
40
-
41
-
42
-
43
-
44
-
45
-
46
-
47
-
48
-
49
-
50
-
51
-
52
-
53
-
54
-
55
-
56
-
57
-
58
-
59
-
60
-
61
-
62
-
63
-
64
-
65
-
66
-
67
-
68
-
69
-
70
-
71
-
72
-
73
-
74
-
75
-
76
-
77
-
78
-
79
-
80
-
81
-
82
-
83
-
84
-
85
-
86
-
87
-
88
-
89
-
90
-
91
-
92
-
93
-
94
-
95
-
96
-
97
-
98
-
99
-
100
-
101
-
102
-
103
-
104
-
105
-
106
-
107
-
108
-
109
-
110
-
111
-
112
-
113
-
114
-
115
-
116
-
117
-
118
-
119
-
120
 |
 |