HTC T-Mobile Dash User Manual - Page 92
Set up a POP3/IMAP4 e-mail account, Messaging > New Account
 |
View all HTC T-Mobile Dash manuals
Add to My Manuals
Save this manual to your list of manuals |
Page 92 highlights
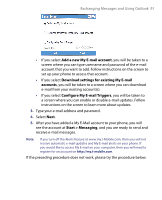
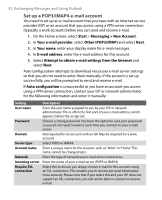
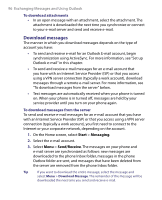
92 Exchanging Messages and Using Outlook Set up a POP3/IMAP4 e-mail account You need to set up an e-mail account that you have with an Internet service provider (ISP) or an account that you access using a VPN server connection (typically a work account) before you can send and receive e-mail. 1. On the Home screen, select Start > Messaging > New Account. 2. In Your e-mail provider, select Other (POP3/IMAP) and select Next. 3. In Your name, enter your display name for e-mail messages. 4. In E-mail address, enter the e-mail address for this account. 5. Select Attempt to obtain e-mail settings from the Internet and select Next. Auto configuration attempts to download necessary e-mail server settings so that you do not need to enter them manually. If the account is set up successfully, you will be prompted to send and receive e-mail. If Auto configuration is unsuccessful or you have an account you access using a VPN server connection, contact your ISP or network administrator for the following information and enter it manually: Setting User name Password Domain Server type Account name Network Incoming server Require SSL connection Description Enter the user name assigned to you by your ISP or network administrator. This is often the first part of your e-mail address, which appears before the at sign (@). Choose a strong password. You have the option to save your password so you do not need to enter it each time you connect to your e-mail server. Not required for an account with an ISP. May be required for a work account. Select POP3 or IMAP4. Enter a unique name for the account, such as "Work" or "Home."This name cannot be changed later. Enter the type of network your e-mail server connects to. Enter the name of your e-mail server (POP3 or IMAP4). Select this to ensure you always receive e-mail for this account using an SSL connection. This enables you to receive personal information more securely. Please note that if you select this and your ISP does not support an SSL connection, you will not be able to connect to receive e-mail.
-
 1
1 -
2
-
3
-
4
-
5
-
6
-
7
-
8
-
9
-
10
-
11
-
12
-
13
-
14
-
15
-
16
-
17
-
18
-
19
-
20
-
21
-
22
-
23
-
24
-
25
-
26
-
27
-
28
-
29
-
30
-
31
-
32
-
33
-
34
-
35
-
36
-
37
-
38
-
39
-
40
-
41
-
42
-
43
-
44
-
45
-
46
-
47
-
48
-
49
-
50
-
51
-
52
-
53
-
54
-
55
-
56
-
57
-
58
-
59
-
60
-
61
-
62
-
63
-
64
-
65
-
66
-
67
-
68
-
69
-
70
-
71
-
72
-
73
-
74
-
75
-
76
-
77
-
78
-
79
-
80
-
81
-
82
-
83
-
84
-
85
-
86
-
 87
87 -
 88
88 -
 89
89 -
 90
90 -
 91
91 -
 92
92 -
 93
93 -
 94
94 -
 95
95 -
 96
96 -
 97
97 -
98
-
99
-
100
-
101
-
102
-
103
-
104
-
105
-
106
-
107
-
108
-
109
-
110
-
111
-
112
-
113
-
114
-
115
-
116
-
117
-
118
-
119
-
120
-
121
-
122
-
123
-
124
-
125
-
126
-
127
-
128
-
129
-
130
-
131
-
132
-
133
-
134
-
135
-
136
-
137
-
138
-
139
-
140
-
141
-
142
-
143
-
144
-
145
-
146
-
147
-
148
-
149
-
150
-
151
-
152
-
153
-
154
-
155
-
156
-
157
-
158
-
159
-
160
-
161
-
162
-
163
-
164
-
165
-
166
-
167
-
168
-
169
-
170
-
171
-
172
-
173
-
174
 |
 |