Hamilton Beach 70825 Use and Care Manual - Page 8
How to Use, Adjustable Slicing Disc
 |
View all Hamilton Beach 70825 manuals
Add to My Manuals
Save this manual to your list of manuals |
Page 8 highlights
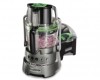
How to Use Adjustable Slicing Disc w WARNING Laceration Hazard: Handle disc carefully; it is very sharp. Press STOP and unplug before inserting or removing blades. 1 2 Place work bowl on base with handle facing forward. Adjust disc to desired thickness by turning the adjustment post. There are 14 adjustment positions, ranging from 1/32" to 1/4" (0.8 to 6 mm) thickness. 3 4 Carefully place disc onto motor shaft. Place lid on work bowl. TIP: Check to make sure no other blades are in the bottom of the work bowl. 5 Raise locking arm up and over bowl and snap into place. 8 6 7 NOTE: Unit will not work unless the large food pusher is inserted and the locking arm is snapped into place on the bowl. For smaller, thinner foods: Put large food pusher into place. Place food into smaller open tube and use small food pusher to push in food. For larger foods: Keep large, medium, and small pushers together. NOTE: Unit will not operate until large food pusher engages the protective interlock. Do not add food above the MAX fill line.
-
 1
1 -
2
-
 3
3 -
 4
4 -
 5
5 -
 6
6 -
 7
7 -
 8
8 -
 9
9 -
 10
10 -
 11
11 -
 12
12 -
 13
13 -
14
-
15
-
16
-
17
-
18
-
19
-
20
-
21
-
22
-
23
-
24
-
25
-
26
-
27
-
28
-
29
-
30
-
31
-
32
-
33
-
34
-
35
-
36
-
37
-
38
-
39
-
40
-
41
-
42
-
43
-
44
-
45
-
46
-
47
-
48
-
49
-
50
-
51
-
52
-
53
-
54
-
55
-
56
-
57
-
58
-
59
-
60
-
61
-
62
-
63
-
64
-
65
-
66
-
67
-
68
-
69
-
70
-
71
-
72
-
73
-
74
-
75
-
76
-
77
-
78
-
79
-
80
-
81
-
82
-
83
-
84
-
85
-
86
-
87
-
88
-
89
-
90
-
91
-
92
-
93
-
94
-
95
-
96
 |
 |
