HP 7960 HP Photosmart 7900 series - (English) Basics Guide - Page 19
ink-backup printing mode
 |
UPC - 844844844303
View all HP 7960 manuals
Add to My Manuals
Save this manual to your list of manuals |
Page 19 highlights
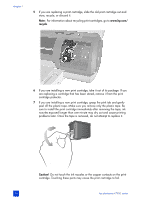
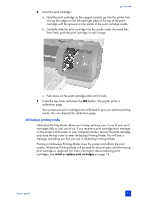
get started 8 Insert the print cartridge: a. Hold the print cartridge so the copper contacts go into the printer first. Line up the ridges on the left and right sides of the top of the print cartridge with the grooves on the inside of the print cartridge cradle. b. Carefully slide the print cartridge into the cradle under the metal bar, then firmly push the print cartridge in until it stops. c. Push down on the print cartridge latch until it locks. 9 Close the top cover and press the OK button. The printer prints a calibration page. Your printer and print cartridges are calibrated to give you optimal printing results. You can discard the calibration page. ink-backup printing mode Ink-backup Printing Mode allows you to keep printing even if one of your print cartridges fails or runs out of ink. If you receive a print cartridge error message on the printer's LCD screen or your computer monitor, remove the print cartridge and close the top cover to enter Ink-backup Printing Mode. You will see a message reminding you that you are in Ink-backup Printing Mode. Printing in Ink-backup Printing Mode slows the printer and affects the print quality. Ink-backup Printing Mode will be used for all print jobs until the missing print cartridge is replaced. For more information about replacing print cartridges, see install or replace print cartridges on page 13. basics guide 15
-
 1
1 -
2
-
3
-
4
-
5
-
6
-
7
-
8
-
9
-
10
-
11
-
12
-
13
-
 14
14 -
 15
15 -
 16
16 -
 17
17 -
 18
18 -
 19
19 -
 20
20 -
 21
21 -
 22
22 -
 23
23 -
 24
24 -
25
-
26
-
27
-
28
-
29
-
30
-
31
-
32
-
33
-
34
-
35
-
36
-
37
-
38
-
39
-
40
-
41
-
42
-
43
-
44
-
45
-
46
-
47
-
48
-
49
-
50
-
51
-
52
-
53
-
54
-
55
-
56
-
57
-
58
-
59
-
60
-
61
-
62
-
63
-
64
 |
 |
