HP 7960 HP Photosmart 7900 series - (English) Basics Guide - Page 45
Borderless Printing, Size is, Properties, Preferences, Print, Change default print settings, Open HP
 |
UPC - 844844844303
View all HP 7960 manuals
Add to My Manuals
Save this manual to your list of manuals |
Page 45 highlights
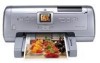
print from your computer 5 Click the Borderless Printing check box. 6 From the Size is list, select a borderless paper size. Borderless paper sizes are clearly marked Borderless on the list. Note: Scroll through the Size is list to see all available borderless paper sizes. 7 Select other settings appropriate for your project. If you clicked Properties or Preferences to view the tabs, click OK to close the window. 8 Click OK or Print to begin printing. use the Windows PC taskbar icons After you install the printer software, two icons appear in the Windows taskbar. These icons help you perform a variety of tasks. Printer icon Memory card icon hp photosmart printer icon Use the HP Photosmart printer icon in the Windows taskbar to open the HP Photosmart Series Properties dialog box, select a default printer, or open the HP Photosmart Series Toolbox. • When you click the printer icon, the printing properties dialog box appears. You can change the default print settings in this dialog box. • When you right-click the printer icon, a menu appears. Make your selection from the following menu items: - Change default print settings-Click to open the printing properties dialog box. - Open HP Photosmart Series Toolbox-Click to open the HP Photosmart Series Toolbox. - HP Photosmart Series-Select the HP Photosmart Series printer you want to use from the list of installed printers. A check mark indicates the currently selected printer. - Exit-Click to close the menu and remove the printer icon from the taskbar. Restart your computer to make this icon appear again. To close the menu without removing the printer icon from the taskbar, click anywhere outside the menu. basics guide 41
-
 1
1 -
2
-
3
-
4
-
5
-
6
-
7
-
8
-
9
-
10
-
11
-
12
-
13
-
14
-
15
-
16
-
17
-
18
-
19
-
20
-
21
-
22
-
23
-
24
-
25
-
26
-
27
-
28
-
29
-
30
-
31
-
32
-
33
-
34
-
35
-
36
-
37
-
38
-
39
-
 40
40 -
 41
41 -
 42
42 -
 43
43 -
 44
44 -
 45
45 -
 46
46 -
 47
47 -
 48
48 -
 49
49 -
 50
50 -
51
-
52
-
53
-
54
-
55
-
56
-
57
-
58
-
59
-
60
-
61
-
62
-
63
-
64
 |
 |