HP 8550 HP Color LaserJet 8550, 8550N, 8550DN, 8550GN, 8550MFP Printer - Getti - Page 19
To connect a parallel cable
 |
View all HP 8550 manuals
Add to My Manuals
Save this manual to your list of manuals |
Page 19 highlights
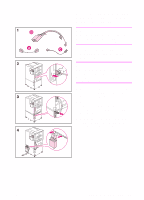
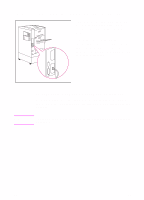
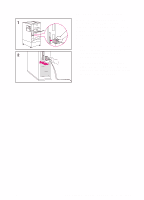
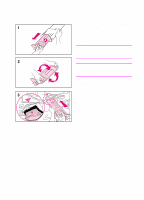
To connect a parallel cable To print through the parallel port, the printer requires a 25-pin male/micro 36-pin male ("C-size") parallel cable that is IEEE-1284 compliant. The cable is not included with the printer. It must be purchased separately. 1 Squeeze the clips on the micro 36-pin end of the parallel cable and plug it into the printer's parallel port. Release the clips. 2 Plug the other end of the parallel cable into the computer. Tighten the screws on the parallel cable to secure the cable to the computer. EN Step 4: Connecting the Printer to the Network 15
-
 1
1 -
2
-
3
-
4
-
5
-
6
-
7
-
8
-
9
-
10
-
11
-
12
-
13
-
 14
14 -
 15
15 -
 16
16 -
 17
17 -
 18
18 -
 19
19 -
 20
20 -
 21
21 -
 22
22 -
 23
23 -
 24
24 -
25
-
26
-
27
-
28
-
29
-
30
-
31
-
32
-
33
-
34
-
35
-
36
-
37
-
38
-
39
-
40
-
41
-
42
-
43
-
44
-
45
-
46
-
47
-
48
-
49
-
50
-
51
-
52
-
53
-
54
-
55
-
56
-
57
-
58
-
59
-
60
-
61
-
62
-
63
-
64
 |
 |

EN
Step 4: Connecting the Printer to the Network
15
To connect a parallel cable
To print through the parallel port, the
printer requires a 25-pin male/micro
36-pin male (“C-size”) parallel cable that
is IEEE-1284 compliant. The cable is not
included with the printer. It must be
purchased separately.
1
Squeeze the clips on the micro 36-pin
end of the parallel cable and plug it
into the printer's parallel port.
Release the clips.
2
Plug the other end of the parallel
cable into the computer. Tighten the
screws on the parallel cable to secure
the cable to the computer.