HP 8550 HP Color LaserJet 8550, 8550N, 8550DN, 8550GN, 8550MFP Printer - Getti - Page 35
Step 8: Configuring Input Trays
 |
View all HP 8550 manuals
Add to My Manuals
Save this manual to your list of manuals |
Page 35 highlights
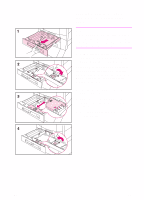
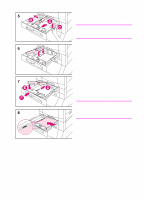
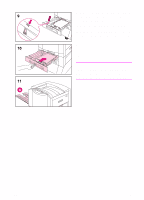
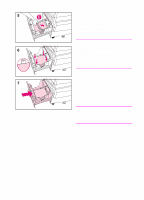
Step 8: Configuring Input Trays When input trays are configured correctly, the printer will print based on media type and size and will automatically use the correct input tray. For example, tray 2 could contain letterhead; tray 3, plain legal-sized paper; and tray 4, plain letter-sized paper. If the trays are configured correctly, when you set up a print job you can choose the media type and size in the printer driver, and the printer will automatically print from the correct input tray. Tray 1 Auto From the control panel, you can also set the media size and type for tray 1 to AUTO. The printer tries to match the media size and/or type specified for the current print job in the print driver to the settings in the control panel and prints from tray 1 if it can. For example, if you set the media size and type for tray 1 to AUTO in the control panel, load letter-size transparencies into tray 1, and send a job to the printer specifying plain Letter in the print driver, the printer prints from tray 1 even if other trays are configured for plain Letter. You can use the AUTO setting to override the printer's tray selection process, forcing the printer to print from tray 1 regardless of the media size and/or type specified in the print driver or loaded in tray 1. Note Although tray 1 does not fully sense the media size, the printer will not print on media that it senses is the wrong width. EN Step 8: Configuring Input Trays 31
-
 1
1 -
2
-
3
-
4
-
5
-
6
-
7
-
8
-
9
-
10
-
11
-
12
-
13
-
14
-
15
-
16
-
17
-
18
-
19
-
20
-
21
-
22
-
23
-
24
-
25
-
26
-
27
-
28
-
29
-
 30
30 -
 31
31 -
 32
32 -
 33
33 -
 34
34 -
 35
35 -
 36
36 -
 37
37 -
 38
38 -
 39
39 -
 40
40 -
41
-
42
-
43
-
44
-
45
-
46
-
47
-
48
-
49
-
50
-
51
-
52
-
53
-
54
-
55
-
56
-
57
-
58
-
59
-
60
-
61
-
62
-
63
-
64
 |
 |