HP Kayak XA 05xx HP Kayak XA Series 05xx, Upgrade & Configuration Guide - Page 100
Selecting the Boot Device Priority
 |
View all HP Kayak XA 05xx manuals
Add to My Manuals
Save this manual to your list of manuals |
Page 100 highlights
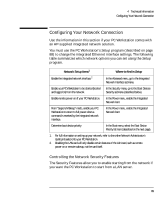
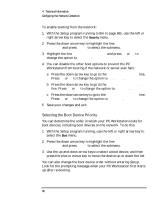
4 Technical Information Configuring Your Network Connection To enable starting from the network: 1 With the Setup program running (refer to page 88), use the left or right arrow key to select the Security menu. 2 Press the down arrow key to highlight the line Boot Devices Security and press Enter to select the submenu. 3 Highlight the line Start from Network and press F7 or F8 to change the option to Enabled. 4 You can disable the other boot options to prevent the PC Workstation from booting if the network or server ever fails: a Press the down arrow key to go to the Start From Floppy line. Press F7 or F8 to change the option to Disabled. b Press the down arrow key to go to the Start From IDE CD-ROM line. Press F7 or F8 to change the option to Disabled. c Press the down arrow key to go to the Start From IDE HDD line. Press F7 or F8 to change the option to Disabled. 5 Save your changes and exit. Selecting the Boot Device Priority You can determine the order in which your PC Workstation looks for boot devices, including boot devices on the network. To do this: 1 With the Setup program running, use the left or right arrow key to select the Boot menu. 2 Press the down arrow key to highlight the line Boot Device Priority and press Enter to select the submenu. 3 Use the up and down arrow keys to select a boot device, and then press the plus or minus key to move the device up or down the list. You can also change the boot device order without entering Setup. Look for the prompting message when your PC Workstation first starts up after re-booting. 90 English
-
 1
1 -
2
-
3
-
4
-
5
-
6
-
7
-
8
-
9
-
10
-
11
-
12
-
13
-
14
-
15
-
16
-
17
-
18
-
19
-
20
-
21
-
22
-
23
-
24
-
25
-
26
-
27
-
28
-
29
-
30
-
31
-
32
-
33
-
34
-
35
-
36
-
37
-
38
-
39
-
40
-
41
-
42
-
43
-
44
-
45
-
46
-
47
-
48
-
49
-
50
-
51
-
52
-
53
-
54
-
55
-
56
-
57
-
58
-
59
-
60
-
61
-
62
-
63
-
64
-
65
-
66
-
67
-
68
-
69
-
70
-
71
-
72
-
73
-
74
-
75
-
76
-
77
-
78
-
79
-
80
-
81
-
82
-
83
-
84
-
85
-
86
-
87
-
88
-
89
-
90
-
91
-
92
-
93
-
94
-
 95
95 -
 96
96 -
 97
97 -
 98
98 -
 99
99 -
 100
100 -
 101
101 -
 102
102 -
 103
103 -
 104
104
 |
 |
