HP LaserJet 9000 HP LaserJet 9000 Series - Software Technical Reference - Page 134
Driver-only installation, Space Available
 |
View all HP LaserJet 9000 manuals
Add to My Manuals
Save this manual to your list of manuals |
Page 134 highlights
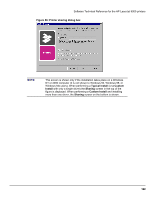
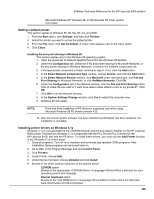
Software Technical Reference for the HP LaserJet 9000 printers Figure 59: Custom installation component selection dialog box Title of dialog box Text in dialog box User options and descriptions Components Select the components you Next takes you to the Printer want to install. Name dialog box. Components: Back returns you to the Installation Type dialog box. Description [Conditional text, according to Cancel takes you to the Exit the item currently highlighted Setup dialog box. in the list] NOTE: Custom installation Space Required automatically selects the options [Specifies disk space required available in the typical installation. to install components currently You can also select from among selected in list] the following components: Space Available [Specifies disk space available on disk drive specified in Choose Destination Location dialog box (00)] • PCL 5e driver • PS driver • screen fonts • printer documentation • accessory documentation Driver-only installation 1. Close all software applications. 2. Click Start, click Settings, and then click Printers. 3. Double-click Add Printer. 4. Answer the questions in the Add Printer Wizard dialog box until you reach the screen with the printer manufacturer list. 5. Click Have Disk. 6. Browse to the driver location using one of the options in this step: 126
-
 1
1 -
2
-
3
-
4
-
5
-
6
-
7
-
8
-
9
-
10
-
11
-
12
-
13
-
14
-
15
-
16
-
17
-
18
-
19
-
20
-
21
-
22
-
23
-
24
-
25
-
26
-
27
-
28
-
29
-
30
-
31
-
32
-
33
-
34
-
35
-
36
-
37
-
38
-
39
-
40
-
41
-
42
-
43
-
44
-
45
-
46
-
47
-
48
-
49
-
50
-
51
-
52
-
53
-
54
-
55
-
56
-
57
-
58
-
59
-
60
-
61
-
62
-
63
-
64
-
65
-
66
-
67
-
68
-
69
-
70
-
71
-
72
-
73
-
74
-
75
-
76
-
77
-
78
-
79
-
80
-
81
-
82
-
83
-
84
-
85
-
86
-
87
-
88
-
89
-
90
-
91
-
92
-
93
-
94
-
95
-
96
-
97
-
98
-
99
-
100
-
101
-
102
-
103
-
104
-
105
-
106
-
107
-
108
-
109
-
110
-
111
-
112
-
113
-
114
-
115
-
116
-
117
-
118
-
119
-
120
-
121
-
122
-
123
-
124
-
125
-
126
-
127
-
128
-
 129
129 -
 130
130 -
 131
131 -
 132
132 -
 133
133 -
 134
134 -
 135
135 -
 136
136 -
 137
137 -
 138
138 -
 139
139 -
140
-
141
-
142
-
143
-
144
-
145
-
146
-
147
-
148
-
149
-
150
-
151
-
152
-
153
-
154
-
155
-
156
-
157
-
158
-
159
-
160
-
161
-
162
-
163
-
164
-
165
-
166
-
167
-
168
-
169
-
170
-
171
-
172
-
173
-
174
-
175
-
176
-
177
-
178
-
179
-
180
-
181
-
182
-
183
-
184
 |
 |
