HP LaserJet Managed MFP E82540-E82560 User Guide - Page 116
Con the destination folder for scanned documents
 |
View all HP LaserJet Managed MFP E82540-E82560 manuals
Add to My Manuals
Save this manual to your list of manuals |
Page 116 highlights
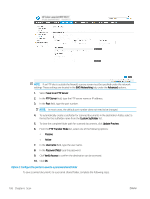
Configure the destination folder for scanned documents Select one of the following options to set up a destination folder. ● Option 1: Configure the printer to save to a shared folder or FTP folder ● Option 2: Configure the printer to save to a personal shared folder Option 1: Configure the printer to save to a shared folder or FTP folder To save scanned documents to a standard shared folder or an FTP folder, complete the following steps. 1. If it is not already selected, select Save to shared folders or FTP folders. 2. Click Add.... The Add Network Folder Path dialog opens. 3. On the Add Network Folder Path dialog, select one of the following options: ● Option one: Save to a standard shared network folder NOTE: For more information about creating shared network folders see Set up a shared folder (c04431534). 1. If it is not already selected, select Save to a standard shared network folder. 2. In the UNC Folder Path field, type a folder path. The folder path can either be the fully-qualified domain name (FQDN) (e.g., \ \servername.us.companyname.net\scans) or the IP address of the server (e.g., \ \16.88.20.20\scans). Be sure that the folder path (e.g., \scans) follows the FQDN or IP address. NOTE: The FQDN can be more reliable than the IP address. If the server gets its IP address via DHCP, the IP address can change. However, the connection with an IP address might be faster because the printer does not need to use DNS to find the destination server. 104 Chapter 6 Scan ENWW
-
 1
1 -
2
-
3
-
4
-
5
-
6
-
7
-
8
-
9
-
10
-
11
-
12
-
13
-
14
-
15
-
16
-
17
-
18
-
19
-
20
-
21
-
22
-
23
-
24
-
25
-
26
-
27
-
28
-
29
-
30
-
31
-
32
-
33
-
34
-
35
-
36
-
37
-
38
-
39
-
40
-
41
-
42
-
43
-
44
-
45
-
46
-
47
-
48
-
49
-
50
-
51
-
52
-
53
-
54
-
55
-
56
-
57
-
58
-
59
-
60
-
61
-
62
-
63
-
64
-
65
-
66
-
67
-
68
-
69
-
70
-
71
-
72
-
73
-
74
-
75
-
76
-
77
-
78
-
79
-
80
-
81
-
82
-
83
-
84
-
85
-
86
-
87
-
88
-
89
-
90
-
91
-
92
-
93
-
94
-
95
-
96
-
97
-
98
-
99
-
100
-
101
-
102
-
103
-
104
-
105
-
106
-
107
-
108
-
109
-
110
-
 111
111 -
 112
112 -
 113
113 -
 114
114 -
 115
115 -
 116
116 -
 117
117 -
 118
118 -
 119
119 -
 120
120 -
 121
121 -
122
-
123
-
124
-
125
-
126
-
127
-
128
-
129
-
130
-
131
-
132
-
133
-
134
-
135
-
136
-
137
-
138
-
139
-
140
-
141
-
142
-
143
-
144
-
145
-
146
-
147
-
148
-
149
-
150
-
151
-
152
-
153
-
154
-
155
-
156
-
157
-
158
-
159
-
160
-
161
-
162
-
163
-
164
-
165
-
166
-
167
-
168
-
169
-
170
-
171
-
172
-
173
-
174
-
175
-
176
-
177
-
178
-
179
-
180
-
181
-
182
-
183
-
184
-
185
-
186
-
187
-
188
-
189
-
190
-
191
-
192
-
193
-
194
-
195
-
196
-
197
-
198
-
199
-
200
-
201
-
202
-
203
-
204
-
205
-
206
-
207
-
208
-
209
-
210
-
211
-
212
-
213
-
214
-
215
-
216
-
217
-
218
-
219
-
220
-
221
-
222
 |
 |
