HP LaserJet Managed MFP E82540-E82560 User Guide - Page 200
Check the paper-type setting for the print job, Check the paper type setting (Windows), Print
 |
View all HP LaserJet Managed MFP E82540-E82560 manuals
Add to My Manuals
Save this manual to your list of manuals |
Page 200 highlights
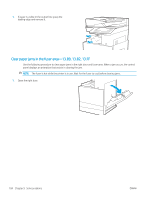
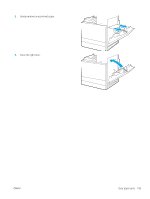
Check the paper-type setting for the print job Check the paper type setting when printing from a software program and the printed pages have smears, fuzzy or dark print, curled paper, scattered dots of toner, loose toner, or small areas of missing toner. ● Check the paper type setting on the printer ● Check the paper type setting (Windows) ● Check the paper type setting (macOS) Check the paper type setting on the printer Check the paper type setting on the printer control panel, and change the setting as needed. 1. Open the tray. 2. Verify that the tray is loaded with the correct type of paper. 3. Close the tray. 4. Follow the control panel instructions to confirm or modify the paper type settings for the tray. Check the paper type setting (Windows) Check the paper type setting for Windows, and change the setting as needed. 1. From the software program, select the Print option. 2. Select the printer, and then click the Properties or Preferences button. 3. Click the Paper/Quality tab. 4. From the Paper Type drop-down list, select the type of paper. 5. Click the OK button to close the Document Properties dialog box. In the Print dialog box, click the OK button to print the job. Check the paper type setting (macOS) Check the paper type setting for macOS, and change the setting as needed. 1. Click the File menu, and then click the Print option. 2. In the Printer menu, select the printer. 3. Click Show Details or Copies & Pages. 4. Open the menus drop-down list, and then click the Paper/Quality menu. 5. Select a type from the Media Type drop-down list. 6. Click the Print button. 188 Chapter 9 Solve problems ENWW
-
 1
1 -
2
-
3
-
4
-
5
-
6
-
7
-
8
-
9
-
10
-
11
-
12
-
13
-
14
-
15
-
16
-
17
-
18
-
19
-
20
-
21
-
22
-
23
-
24
-
25
-
26
-
27
-
28
-
29
-
30
-
31
-
32
-
33
-
34
-
35
-
36
-
37
-
38
-
39
-
40
-
41
-
42
-
43
-
44
-
45
-
46
-
47
-
48
-
49
-
50
-
51
-
52
-
53
-
54
-
55
-
56
-
57
-
58
-
59
-
60
-
61
-
62
-
63
-
64
-
65
-
66
-
67
-
68
-
69
-
70
-
71
-
72
-
73
-
74
-
75
-
76
-
77
-
78
-
79
-
80
-
81
-
82
-
83
-
84
-
85
-
86
-
87
-
88
-
89
-
90
-
91
-
92
-
93
-
94
-
95
-
96
-
97
-
98
-
99
-
100
-
101
-
102
-
103
-
104
-
105
-
106
-
107
-
108
-
109
-
110
-
111
-
112
-
113
-
114
-
115
-
116
-
117
-
118
-
119
-
120
-
121
-
122
-
123
-
124
-
125
-
126
-
127
-
128
-
129
-
130
-
131
-
132
-
133
-
134
-
135
-
136
-
137
-
138
-
139
-
140
-
141
-
142
-
143
-
144
-
145
-
146
-
147
-
148
-
149
-
150
-
151
-
152
-
153
-
154
-
155
-
156
-
157
-
158
-
159
-
160
-
161
-
162
-
163
-
164
-
165
-
166
-
167
-
168
-
169
-
170
-
171
-
172
-
173
-
174
-
175
-
176
-
177
-
178
-
179
-
180
-
181
-
182
-
183
-
184
-
185
-
186
-
187
-
188
-
189
-
190
-
191
-
192
-
193
-
194
-
 195
195 -
 196
196 -
 197
197 -
 198
198 -
 199
199 -
 200
200 -
 201
201 -
 202
202 -
 203
203 -
 204
204 -
 205
205 -
206
-
207
-
208
-
209
-
210
-
211
-
212
-
213
-
214
-
215
-
216
-
217
-
218
-
219
-
220
-
221
-
222
 |
 |
