HP LaserJet Pro P1102 HP LaserJet Professional P1100 Series Printer - Service - Page 148
Solve connectivity problems, Solve direct-connect problems, Solve wireless problems
 |
View all HP LaserJet Pro P1102 manuals
Add to My Manuals
Save this manual to your list of manuals |
Page 148 highlights
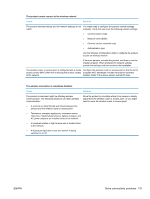
Solve connectivity problems Solve direct-connect problems If you have connected the product directly to a computer, check the USB cable. ● Verify that the cable is connected to the computer and to the product. ● Verify that the cable is not longer than 2 m (6.56 ft). Replace the cable if necessary. ● Verify that the cable is working correctly by connecting it to another product. Replace the cable if necessary. Solve wireless problems NOTE: HP LaserJet Professional P1100w Printer series only The installation program cannot detect the product during the setup process. Cause Solution The product is off. Verify that the product is on and ready. Restart the product if necessary. The product is too far away from the wireless router or access Move the product closer to the wireless router or access point. point. A personal firewall program is blocking communication. Temporarily disable the firewall program to install the product. Re-enable the firewall program once the product installation is complete. If disabling the firewall allows you to communicate with the product, you might want to assign the product a static IP address, and then re-enable the firewall. For information about firewalls that are used in an HP environment, see www.hp.com/support/XP_firewall_information. The product is not communicating with the wireless router or ● Verify that the wireless light is on. If it is not on, press access point. the wireless button. ● Move the product closer to the wireless router or access point, and then try again. ● Restore the default wireless settings. a. Turn the product off. b. Press and hold the wireless button and the cancel button, and then turn the product on. c. Hold the buttons until all the lights blink in unison, and then release the buttons. If the error persists, uninstall the product, and then re-run the installer program. When prompted for network settings, provide the settings, and then continue the installation. 130 Chapter 3 Solve problems ENWW
-
 1
1 -
2
-
3
-
4
-
5
-
6
-
7
-
8
-
9
-
10
-
11
-
12
-
13
-
14
-
15
-
16
-
17
-
18
-
19
-
20
-
21
-
22
-
23
-
24
-
25
-
26
-
27
-
28
-
29
-
30
-
31
-
32
-
33
-
34
-
35
-
36
-
37
-
38
-
39
-
40
-
41
-
42
-
43
-
44
-
45
-
46
-
47
-
48
-
49
-
50
-
51
-
52
-
53
-
54
-
55
-
56
-
57
-
58
-
59
-
60
-
61
-
62
-
63
-
64
-
65
-
66
-
67
-
68
-
69
-
70
-
71
-
72
-
73
-
74
-
75
-
76
-
77
-
78
-
79
-
80
-
81
-
82
-
83
-
84
-
85
-
86
-
87
-
88
-
89
-
90
-
91
-
92
-
93
-
94
-
95
-
96
-
97
-
98
-
99
-
100
-
101
-
102
-
103
-
104
-
105
-
106
-
107
-
108
-
109
-
110
-
111
-
112
-
113
-
114
-
115
-
116
-
117
-
118
-
119
-
120
-
121
-
122
-
123
-
124
-
125
-
126
-
127
-
128
-
129
-
130
-
131
-
132
-
133
-
134
-
135
-
136
-
137
-
138
-
139
-
140
-
141
-
142
-
 143
143 -
 144
144 -
 145
145 -
 146
146 -
 147
147 -
 148
148 -
 149
149 -
 150
150 -
 151
151 -
 152
152 -
 153
153 -
154
-
155
-
156
-
157
-
158
-
159
-
160
-
161
-
162
-
163
-
164
-
165
-
166
-
167
-
168
-
169
-
170
-
171
-
172
-
173
-
174
-
175
-
176
-
177
-
178
-
179
-
180
-
181
-
182
-
183
-
184
-
185
-
186
-
187
-
188
-
189
-
190
-
191
-
192
-
193
-
194
-
195
-
196
-
197
-
198
-
199
-
200
-
201
-
202
-
203
-
204
-
205
-
206
 |
 |