HP LaserJet Pro P1102 HP LaserJet Professional P1100 Series Printer - Service - Page 98
Engine controller PCA, Remove the engine controller PCA, Before proceeding - printer cartridge
 |
View all HP LaserJet Pro P1102 manuals
Add to My Manuals
Save this manual to your list of manuals |
Page 98 highlights
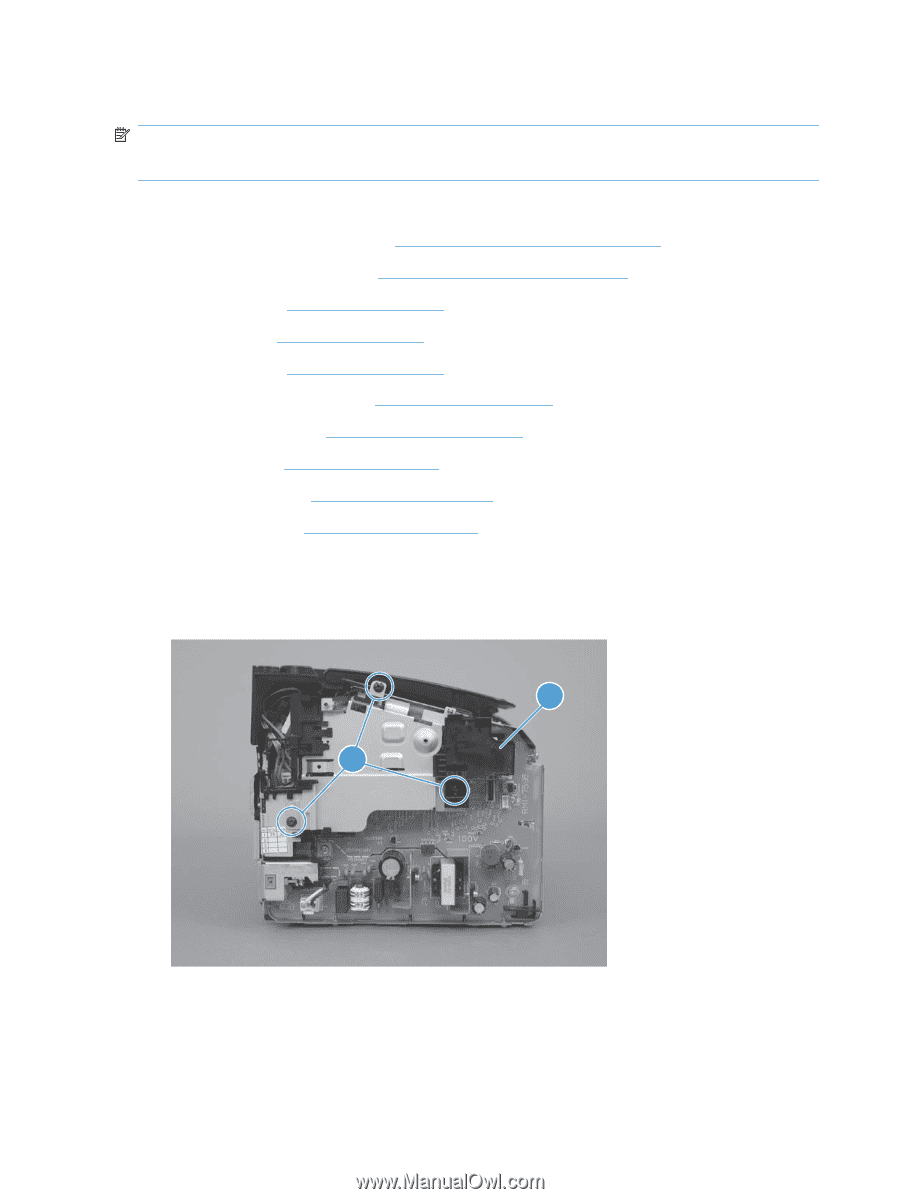
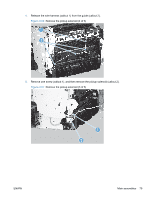
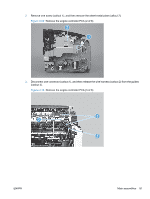
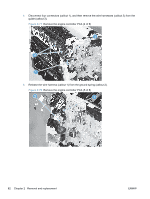
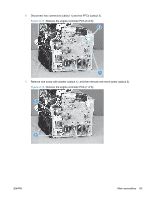
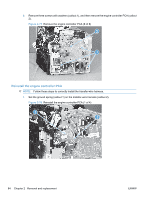
Engine controller PCA NOTE: Some photos in this section show a product similar to the HP LaserJet Professional P1100 Printer series or the HP LaserJet Professional P1100w Printer series, however the procedures for replacement and repair in this section are correct for your product. Before proceeding, remove the following components: ● Input tray or main-input tray. See Input tray or main-input tray on page 40. ● Output bin tray extension. See Output bin tray extension on page 41. ● Front cover. See Front cover on page 42. ● Left cover. See Left cover on page 43. ● Right cover. See Right cover on page 46. ● Cartridge door assembly. See Cartridge door on page 48 ● Face-down cover. See Face-down cover on page 50. ● Rear cover. See Rear cover on page 52. ● Formatter PCA. See Formatter PCA on page 54. ● Wireless PCA. See Wireless PCA on page 57. Remove the engine controller PCA 1. Remove three screws (callout 1), and then remove the plastic plate (callout 2). Figure 2-68 Remove the engine controller PCA (1 of 8) 2 1 80 Chapter 2 Removal and replacement ENWW
-
 1
1 -
2
-
3
-
4
-
5
-
6
-
7
-
8
-
9
-
10
-
11
-
12
-
13
-
14
-
15
-
16
-
17
-
18
-
19
-
20
-
21
-
22
-
23
-
24
-
25
-
26
-
27
-
28
-
29
-
30
-
31
-
32
-
33
-
34
-
35
-
36
-
37
-
38
-
39
-
40
-
41
-
42
-
43
-
44
-
45
-
46
-
47
-
48
-
49
-
50
-
51
-
52
-
53
-
54
-
55
-
56
-
57
-
58
-
59
-
60
-
61
-
62
-
63
-
64
-
65
-
66
-
67
-
68
-
69
-
70
-
71
-
72
-
73
-
74
-
75
-
76
-
77
-
78
-
79
-
80
-
81
-
82
-
83
-
84
-
85
-
86
-
87
-
88
-
89
-
90
-
91
-
92
-
 93
93 -
 94
94 -
 95
95 -
 96
96 -
 97
97 -
 98
98 -
 99
99 -
 100
100 -
 101
101 -
 102
102 -
 103
103 -
104
-
105
-
106
-
107
-
108
-
109
-
110
-
111
-
112
-
113
-
114
-
115
-
116
-
117
-
118
-
119
-
120
-
121
-
122
-
123
-
124
-
125
-
126
-
127
-
128
-
129
-
130
-
131
-
132
-
133
-
134
-
135
-
136
-
137
-
138
-
139
-
140
-
141
-
142
-
143
-
144
-
145
-
146
-
147
-
148
-
149
-
150
-
151
-
152
-
153
-
154
-
155
-
156
-
157
-
158
-
159
-
160
-
161
-
162
-
163
-
164
-
165
-
166
-
167
-
168
-
169
-
170
-
171
-
172
-
173
-
174
-
175
-
176
-
177
-
178
-
179
-
180
-
181
-
182
-
183
-
184
-
185
-
186
-
187
-
188
-
189
-
190
-
191
-
192
-
193
-
194
-
195
-
196
-
197
-
198
-
199
-
200
-
201
-
202
-
203
-
204
-
205
-
206
 |
 |