HP Latex 1500 User guide - Page 102
Delete a print job, Image composition, Tiling
 |
View all HP Latex 1500 manuals
Add to My Manuals
Save this manual to your list of manuals |
Page 102 highlights
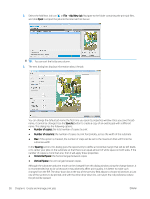
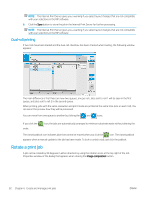
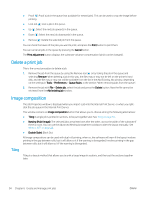
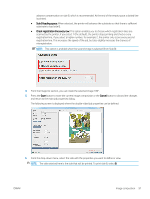
● Proof : Proof a job in the queue (not available for nested jobs). This can be used to crop the image before printing. ● Lock Job : Lock a job in the queue. ● Up : Select the next job upwards in the queue. ● Down : Select the next job downwards in the queue. ● Remove : Delete the selected job from the queue. You can check the boxes of the jobs you want to print, and press the Print button to print them. You can cancel all jobs in the queue by pressing the Cancel button. The Print adjustment button displays the substrate-advance compensation (which can be changed). Delete a print job This is the correct procedure to delete a job. 1. Remove the job from the queue by using the Remove icon or by ticking the job in the queue and selecting Remove. When deleting a job in this way, the files may or may not be left on the printer's hard disk, and the file may or may not still be available from the list in the Add Existing Job window, depending on the settings in Tools > Preferences > Queue Rules, in the section "When removing jobs from the queue". 2. Remove the job with File > Delete job, select the job and press the Delete button. Now the file cannot be retrieved from the Add existing job window. Image composition Tiling The Job Properties window is displayed when you import a job into the Internal Print Server, or when you rightclick the job queue in the Internal Print Server. This window contains an Image composition button that allows you to choose among the following alternatives: ● Tiling: A single job is printed in sections, to be put together later. See Tiling on page 94. ● Nesting (Multi-image): The selected jobs are printed one after the other, across the width of the substrate if there is room. You can use the Advanced Nesting Arrangement window to alter the layout manually. See What is JDF? on page 27. ● Double Sided: Block Out. All image compositions can be used with dual-roll printing, when so, the software will warn if the layout involves printing in the gap between rolls; but it will allow so it if the warning is disregarded. Involves printing in the gap between rolls; but it will allow so it if the warning is disregarded. Tiling is a layout method that allows you to print a large image in sections, and then put the sections together later. 94 Chapter 6 Create and manage print jobs ENWW
-
 1
1 -
2
-
3
-
4
-
5
-
6
-
7
-
8
-
9
-
10
-
11
-
12
-
13
-
14
-
15
-
16
-
17
-
18
-
19
-
20
-
21
-
22
-
23
-
24
-
25
-
26
-
27
-
28
-
29
-
30
-
31
-
32
-
33
-
34
-
35
-
36
-
37
-
38
-
39
-
40
-
41
-
42
-
43
-
44
-
45
-
46
-
47
-
48
-
49
-
50
-
51
-
52
-
53
-
54
-
55
-
56
-
57
-
58
-
59
-
60
-
61
-
62
-
63
-
64
-
65
-
66
-
67
-
68
-
69
-
70
-
71
-
72
-
73
-
74
-
75
-
76
-
77
-
78
-
79
-
80
-
81
-
82
-
83
-
84
-
85
-
86
-
87
-
88
-
89
-
90
-
91
-
92
-
93
-
94
-
95
-
96
-
 97
97 -
 98
98 -
 99
99 -
 100
100 -
 101
101 -
 102
102 -
 103
103 -
 104
104 -
 105
105 -
 106
106 -
 107
107 -
108
-
109
-
110
-
111
-
112
-
113
-
114
-
115
-
116
-
117
-
118
-
119
-
120
-
121
-
122
-
123
-
124
-
125
-
126
-
127
-
128
-
129
-
130
-
131
-
132
-
133
-
134
-
135
-
136
-
137
-
138
-
139
-
140
-
141
-
142
-
143
-
144
-
145
-
146
-
147
-
148
-
149
-
150
-
151
-
152
-
153
-
154
-
155
-
156
-
157
-
158
-
159
-
160
-
161
-
162
-
163
-
164
-
165
-
166
-
167
-
168
-
169
-
170
-
171
-
172
-
173
-
174
-
175
-
176
-
177
-
178
-
179
-
180
-
181
-
182
-
183
-
184
-
185
-
186
-
187
-
188
-
189
-
190
-
191
-
192
-
193
-
194
-
195
-
196
-
197
-
198
-
199
-
200
-
201
-
202
-
203
-
204
-
205
-
206
-
207
-
208
-
209
-
210
-
211
-
212
-
213
-
214
-
215
-
216
-
217
-
218
-
219
-
220
-
221
-
222
-
223
-
224
-
225
-
226
-
227
-
228
-
229
-
230
-
231
-
232
-
233
-
234
-
235
-
236
-
237
-
238
-
239
-
240
-
241
-
242
-
243
-
244
-
245
-
246
-
247
-
248
-
249
-
250
-
251
-
252
-
253
-
254
-
255
-
256
-
257
-
258
-
259
-
260
-
261
-
262
-
263
-
264
-
265
-
266
-
267
-
268
-
269
-
270
-
271
-
272
-
273
-
274
-
275
-
276
-
277
-
278
-
279
-
280
-
281
-
282
-
283
-
284
-
285
-
286
-
287
-
288
-
289
-
290
-
291
-
292
-
293
-
294
-
295
-
296
-
297
-
298
-
299
-
300
-
301
-
302
-
303
-
304
-
305
-
306
-
307
-
308
-
309
-
310
-
311
-
312
-
313
-
314
-
315
-
316
-
317
-
318
-
319
-
320
-
321
-
322
-
323
-
324
-
325
-
326
-
327
-
328
-
329
-
330
-
331
-
332
-
333
-
334
-
335
-
336
-
337
-
338
-
339
-
340
-
341
-
342
-
343
-
344
-
345
-
346
-
347
-
348
-
349
-
350
-
351
-
352
-
353
-
354
-
355
-
356
-
357
-
358
-
359
-
360
-
361
-
362
-
363
-
364
-
365
-
366
-
367
-
368
-
369
-
370
-
371
-
372
-
373
-
374
-
375
-
376
-
377
-
378
-
379
-
380
-
381
-
382
-
383
-
384
-
385
-
386
-
387
-
388
-
389
-
390
-
391
-
392
-
393
-
394
-
395
-
396
-
397
-
398
-
399
-
400
-
401
-
402
-
403
-
404
-
405
-
406
-
407
-
408
-
409
-
410
-
411
-
412
-
413
-
414
-
415
-
416
-
417
-
418
-
419
-
420
-
421
-
422
-
423
-
424
-
425
-
426
-
427
-
428
-
429
-
430
-
431
-
432
-
433
-
434
-
435
-
436
-
437
-
438
-
439
-
440
 |
 |
