HP ML370 ProLiant ML370 Generation 3 Server Maintenance and Service Guide - Page 68
Press down evenly on the DIMM until it is seated securely in the slot and the latches
 |
UPC - 613326765616
View all HP ML370 manuals
Add to My Manuals
Save this manual to your list of manuals |
Page 68 highlights
Removal and Replacement Procedures CAUTION: Use only HP or Compaq branded DIMMs. DIMMs from other sources may adversely affect data integrity. IMPORTANT: DIMMs do not seat fully if turned the wrong way. To replace the DIMMs: 1. Align the key slot on the bottom edge of the DIMM with the tab on the slot. 2. Press down evenly on the DIMM until it is seated securely in the slot and the latches close. HP ProLiant ML370 Generation 3 Server Maintenance and Service Guide 2-53
-
 1
1 -
2
-
3
-
4
-
5
-
6
-
7
-
8
-
9
-
10
-
11
-
12
-
13
-
14
-
15
-
16
-
17
-
18
-
19
-
20
-
21
-
22
-
23
-
24
-
25
-
26
-
27
-
28
-
29
-
30
-
31
-
32
-
33
-
34
-
35
-
36
-
37
-
38
-
39
-
40
-
41
-
42
-
43
-
44
-
45
-
46
-
47
-
48
-
49
-
50
-
51
-
52
-
53
-
54
-
55
-
56
-
57
-
58
-
59
-
60
-
61
-
62
-
 63
63 -
 64
64 -
 65
65 -
 66
66 -
 67
67 -
 68
68 -
 69
69 -
 70
70 -
 71
71 -
 72
72 -
 73
73 -
74
-
75
-
76
-
77
-
78
-
79
-
80
-
81
-
82
-
83
-
84
-
85
-
86
-
87
-
88
-
89
-
90
-
91
-
92
-
93
-
94
-
95
-
96
-
97
-
98
-
99
-
100
-
101
-
102
-
103
-
104
-
105
-
106
-
107
-
108
-
109
-
110
-
111
-
112
-
113
 |
 |

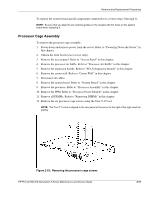
Removal and Replacement Procedures
CAUTION:
Use only HP or Compaq branded DIMMs. DIMMs from other sources may
adversely affect data integrity.
IMPORTANT:
DIMMs do not seat fully if turned the wrong way.
To replace the DIMMs:
1.
Align the key slot on the bottom edge of the DIMM with the tab on the slot.
2.
Press down evenly on the DIMM until it is seated securely in the slot and the latches
close.
HP ProLiant ML370 Generation 3 Server Maintenance and Service Guide
2-53