HP ML370 ProLiant ML370 Generation 3 Server Maintenance and Service Guide - Page 71
System Board, Removing the system board
 |
UPC - 613326765616
View all HP ML370 manuals
Add to My Manuals
Save this manual to your list of manuals |
Page 71 highlights
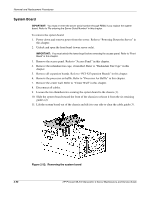
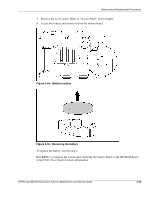
Removal and Replacement Procedures System Board IMPORTANT: You must re-enter the server serial number through RBSU if you replace the system board. Refer to "Re-entering the Server Serial Number" in this chapter. To remove the system board: 1. Power down and remove power from the server. Refer to "Powering Down the Server" in this chapter. 2. Unlock and open the front bezel (tower server only). IMPORTANT: You must unlock the tower bezel before removing the access panel. Refer to "Front Bezel" in this chapter. 3. Remove the access panel. Refer to "Access Panel" in this chapter. 4. Remove the redundant fan cage, if installed. Refer to "Redundant Fan Cage" in this chapter. 5. Remove all expansion boards. Refer to "PCI-X Expansion Boards" in this chapter. 6. Remove the processor air baffle. Refer to "Processor Air Baffle" in this chapter. 7. Remove the center wall. Refer to "Center Wall" in this chapter. 8. Disconnect all cables. 9. Loosen the two thumbscrews securing the system board to the chassis (1). 10. Slide the system board toward the front of the chassis to release it from the six retaining guides (2). 11. Lift the system board out of the chassis and tilt it to one side to clear the cable guide (3). Figure 2-52: Removing the system board 2-56 HP ProLiant ML370 Generation 3 Server Maintenance and Service Guide
-
 1
1 -
2
-
3
-
4
-
5
-
6
-
7
-
8
-
9
-
10
-
11
-
12
-
13
-
14
-
15
-
16
-
17
-
18
-
19
-
20
-
21
-
22
-
23
-
24
-
25
-
26
-
27
-
28
-
29
-
30
-
31
-
32
-
33
-
34
-
35
-
36
-
37
-
38
-
39
-
40
-
41
-
42
-
43
-
44
-
45
-
46
-
47
-
48
-
49
-
50
-
51
-
52
-
53
-
54
-
55
-
56
-
57
-
58
-
59
-
60
-
61
-
62
-
63
-
64
-
65
-
 66
66 -
 67
67 -
 68
68 -
 69
69 -
 70
70 -
 71
71 -
 72
72 -
 73
73 -
 74
74 -
 75
75 -
 76
76 -
77
-
78
-
79
-
80
-
81
-
82
-
83
-
84
-
85
-
86
-
87
-
88
-
89
-
90
-
91
-
92
-
93
-
94
-
95
-
96
-
97
-
98
-
99
-
100
-
101
-
102
-
103
-
104
-
105
-
106
-
107
-
108
-
109
-
110
-
111
-
112
-
113
 |
 |
