HP OMEN Transcend 14 Maintenance and Service GuideOMEN Transcend 14 inch Gamin - Page 47
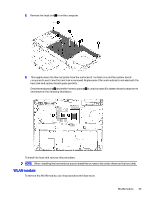
that covers the screws at the top, on the touchpad.
 |
View all HP OMEN Transcend 14 manuals
Add to My Manuals
Save this manual to your list of manuals |
Page 47 highlights
2. Remove the bottom cover (see Bottom cover on page 30). 3. Remove the battery (see Battery on page 31). Remove the touchpad: 1. Remove the two Phillips M2.0 × 3.0 screws (1) and the the two Phillips M1.6 × 2.5 screws (2) from the touchpad bracket. 2. Remove the bracket (3). 3. Remove the tape (1) from the connector on the touchpad. 4. Disconnect the cable from the connector (2) on the touchpad. 5. (Models with 4-zone keyboard lighting) Lift the keyboard cable (3) that covers the screws at the top of the touchpad. 6. Lift the conductive tape (4) from the left screw. 7. Remove the five Phillips M1.2 × 1.2 screws (5) from the touchpad. Touchpad 41
-
 1
1 -
2
-
3
-
4
-
5
-
6
-
7
-
8
-
9
-
10
-
11
-
12
-
13
-
14
-
15
-
16
-
17
-
18
-
19
-
20
-
21
-
22
-
23
-
24
-
25
-
26
-
27
-
28
-
29
-
30
-
31
-
32
-
33
-
34
-
35
-
36
-
37
-
38
-
39
-
40
-
41
-
 42
42 -
 43
43 -
 44
44 -
 45
45 -
 46
46 -
 47
47 -
 48
48 -
 49
49 -
 50
50 -
 51
51 -
 52
52 -
53
-
54
-
55
-
56
-
57
-
58
-
59
-
60
-
61
-
62
-
63
-
64
-
65
-
66
-
67
-
68
-
69
-
70
-
71
-
72
-
73
-
74
-
75
-
76
-
77
-
78
-
79
-
80
-
81
-
82
 |
 |
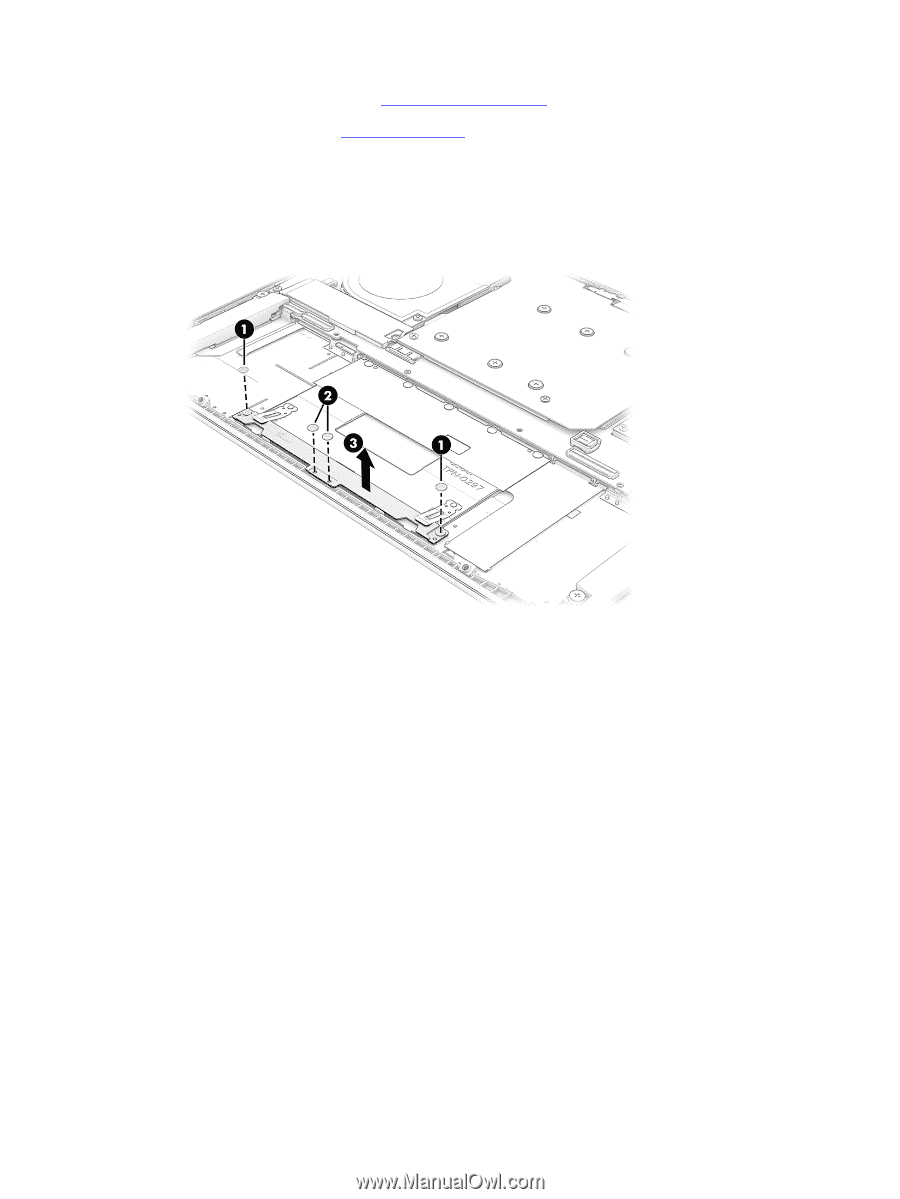
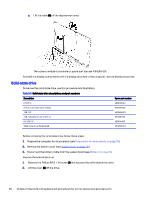
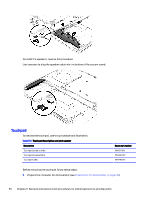
2.
Remove the bottom cover (see
Bottom cover
on page
30
).
3.
Remove the battery (see
Battery
on page
31
).
Remove the touchpad:
1.
Remove the two Phillips M2.0 × 3.0 screws
(1)
and the the two Phillips M1.6 × 2.5 screws
(2)
from the
touchpad bracket.
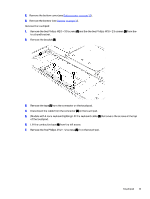
2.
Remove the bracket
(3)
.
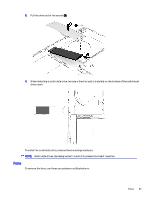
3.
Remove the tape
(1)
from the connector on the touchpad.
4.
Disconnect the cable from the connector
(2)
on the touchpad.
5.
(Models with 4-zone keyboard lighting) Lift the keyboard cable
(3)
that covers the screws at the top
of the touchpad.
6.
Lift the conductive tape
(4)
from the left screw.
7.
Remove the five Phillips M1.2 × 1.2 screws
(5)
from the touchpad.
Touchpad
41