HP OMEN Transcend 14 Maintenance and Service GuideOMEN Transcend 14 inch Gamin - Page 51
Headphone (ULL) module, Remove the headphone module cover
 |
View all HP OMEN Transcend 14 manuals
Add to My Manuals
Save this manual to your list of manuals |
Page 51 highlights
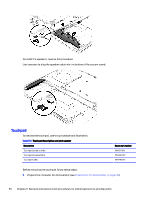
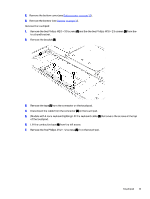
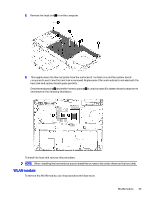
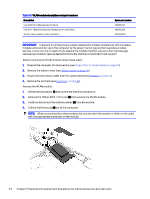
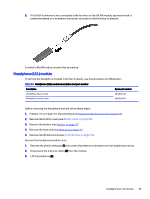
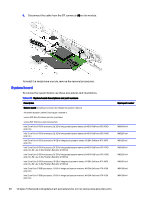
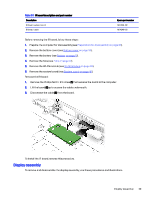
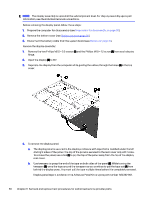
5. If the WLAN antenna is not connected to the terminal on the WLAN module, you must install a protective sleeve on the antenna connector, as shown in the following illustration. To install a WLAN module, reverse this procedure. Headphone (ULL) module To remove the headphone module from the computer, use this procedure and illustration. Table 5-9 Headphone (ULL) module description and part number Description Spare part number Headphone (ULL) module Headphone module cable N84260-001 N84250-001 Before removing the headphone module, follow these steps: 1. Prepare the computer for disassembly (see Preparation for disassembly on page 30). 2. Remove the bottom cover (see Bottom cover on page 30). 3. Remove the battery (see Battery on page 31). 4. Remove the heat sink (see Heat sink on page 42). 5. Remove the WLAN module (see WLAN module on page 43). Remove the headphone module cover: 1. Remove the plastic protector (1) that covers the antenna connectors on the headphone module. 2. Disconnect the antenna cables (2) from the module. 3. Lift the module up (3). Headphone (ULL) module 45
-
 1
1 -
2
-
3
-
4
-
5
-
6
-
7
-
8
-
9
-
10
-
11
-
12
-
13
-
14
-
15
-
16
-
17
-
18
-
19
-
20
-
21
-
22
-
23
-
24
-
25
-
26
-
27
-
28
-
29
-
30
-
31
-
32
-
33
-
34
-
35
-
36
-
37
-
38
-
39
-
40
-
41
-
42
-
43
-
44
-
45
-
 46
46 -
 47
47 -
 48
48 -
 49
49 -
 50
50 -
 51
51 -
 52
52 -
 53
53 -
 54
54 -
 55
55 -
 56
56 -
57
-
58
-
59
-
60
-
61
-
62
-
63
-
64
-
65
-
66
-
67
-
68
-
69
-
70
-
71
-
72
-
73
-
74
-
75
-
76
-
77
-
78
-
79
-
80
-
81
-
82
 |
 |
