HP OMEN Transcend 14 Maintenance and Service GuideOMEN Transcend 14 inch Gamin - Page 55
Display assembly, Lift the board
 |
View all HP OMEN Transcend 14 manuals
Add to My Manuals
Save this manual to your list of manuals |
Page 55 highlights
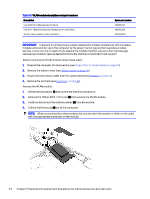
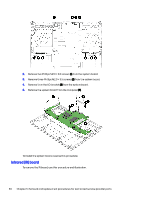
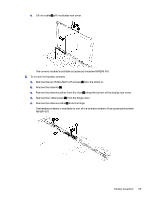
Table 5-11 IR board description and part number Description IR board sensor board IR board cable Spare part number N84259-001 N84248-001 Before removing the IR board, follow these steps: 1. Prepare the computer for disassembly (see Preparation for disassembly on page 30). 2. Remove the bottom cover (see Bottom cover on page 30). 3. Remove the battery (see Battery on page 31). 4. Remove the fans (see Fans on page 37). 5. Remove the WLAN module (see WLAN module on page 43). 6. Remove the system board (see System board on page 46). Remove the IR board: 1. Remove the Phillips M2.0 × 2.5 screw (1) that secures the board to the computer. 2. Lift the board (2)up to access the cable underneath. 3. Disconnect the cable (3) from the board. To install the IR board, reverse this procedure. Display assembly To remove and disassemble the display assembly, use these procedures and illustrations. Display assembly 49
-
 1
1 -
2
-
3
-
4
-
5
-
6
-
7
-
8
-
9
-
10
-
11
-
12
-
13
-
14
-
15
-
16
-
17
-
18
-
19
-
20
-
21
-
22
-
23
-
24
-
25
-
26
-
27
-
28
-
29
-
30
-
31
-
32
-
33
-
34
-
35
-
36
-
37
-
38
-
39
-
40
-
41
-
42
-
43
-
44
-
45
-
46
-
47
-
48
-
49
-
 50
50 -
 51
51 -
 52
52 -
 53
53 -
 54
54 -
 55
55 -
 56
56 -
 57
57 -
 58
58 -
 59
59 -
 60
60 -
61
-
62
-
63
-
64
-
65
-
66
-
67
-
68
-
69
-
70
-
71
-
72
-
73
-
74
-
75
-
76
-
77
-
78
-
79
-
80
-
81
-
82
 |
 |
