HP OfficeJet Pro 8020 User Guide - Page 158
Fix print quality issues, Setup, Printer Maintenance, Clean Printhead
 |
View all HP OfficeJet Pro 8020 manuals
Add to My Manuals
Save this manual to your list of manuals |
Page 158 highlights
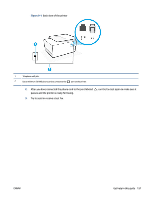
3. With the printer turned on, disconnect the power cord from the back of the printer. 4. Unplug the power cord from the wall outlet. 5. Wait at least 15 seconds. 6. Plug the power cord back into the wall outlet. 7. Reconnect the power cord to the back of the printer. 8. If the printer does not turn on by itself, press the Power button to turn on the printer. 9. Try using the printer again. Fix print quality issues NOTE: To avoid print quality problems, always turn the printer off using the Power button, and wait until the Power button light goes out before you pull the plug or turn off a power strip. This allows the printer to move the cartridges to a capped position, where they are protected from drying out. To improve print quality from the printer display 1. Clean the printhead from the printer software To clean the printhead from the printer display a. Load Letter, A4, or Legal unused plain white paper into the input tray. b. From the printer control panel, touch or swipe down the tab at the top of the screen to open the Dashboard, and then touch ( Setup ). c. Touch Printer Maintenance , select Clean Printhead, and then follow the onscreen instructions. 2. Make sure you are using original HP cartridges. 3. Make sure you have selected the appropriate paper type and print quality. 4. Check the estimated ink levels to determine if the cartridges are low on ink. For more information, see Check the estimated ink levels. If the cartridges are low on ink, consider replacing them. 5. Align the printhead. To align the printhead from the printer display a. Load Letter, A4, or Legal unused plain white paper into the input tray. b. From the printer control panel, touch or swipe down the tab at the top of the screen to open the Dashboard, and then touch ( Setup ). c. Touch Printer Maintenance , touch Align Printhead, and then follow the onscreen instructions. 6. Print a diagnostics page if the cartridges are not low on ink. 152 Chapter 9 Solve a problem ENWW
-
 1
1 -
2
-
3
-
4
-
5
-
6
-
7
-
8
-
9
-
10
-
11
-
12
-
13
-
14
-
15
-
16
-
17
-
18
-
19
-
20
-
21
-
22
-
23
-
24
-
25
-
26
-
27
-
28
-
29
-
30
-
31
-
32
-
33
-
34
-
35
-
36
-
37
-
38
-
39
-
40
-
41
-
42
-
43
-
44
-
45
-
46
-
47
-
48
-
49
-
50
-
51
-
52
-
53
-
54
-
55
-
56
-
57
-
58
-
59
-
60
-
61
-
62
-
63
-
64
-
65
-
66
-
67
-
68
-
69
-
70
-
71
-
72
-
73
-
74
-
75
-
76
-
77
-
78
-
79
-
80
-
81
-
82
-
83
-
84
-
85
-
86
-
87
-
88
-
89
-
90
-
91
-
92
-
93
-
94
-
95
-
96
-
97
-
98
-
99
-
100
-
101
-
102
-
103
-
104
-
105
-
106
-
107
-
108
-
109
-
110
-
111
-
112
-
113
-
114
-
115
-
116
-
117
-
118
-
119
-
120
-
121
-
122
-
123
-
124
-
125
-
126
-
127
-
128
-
129
-
130
-
131
-
132
-
133
-
134
-
135
-
136
-
137
-
138
-
139
-
140
-
141
-
142
-
143
-
144
-
145
-
146
-
147
-
148
-
149
-
150
-
151
-
152
-
 153
153 -
 154
154 -
 155
155 -
 156
156 -
 157
157 -
 158
158 -
 159
159 -
 160
160 -
 161
161 -
 162
162 -
 163
163 -
164
-
165
-
166
-
167
-
168
-
169
-
170
-
171
-
172
-
173
-
174
-
175
-
176
-
177
-
178
-
179
-
180
-
181
-
182
-
183
-
184
-
185
-
186
-
187
-
188
-
189
-
190
-
191
-
192
-
193
-
194
-
195
-
196
-
197
-
198
-
199
-
200
-
201
-
202
-
203
-
204
-
205
 |
 |