HP Photosmart C6300 Basic Guide - Page 25
Scan an image, Make a copy, To print photos, View & Print, To scan to a computer, Start Scan - scan to computer
 |
View all HP Photosmart C6300 manuals
Add to My Manuals
Save this manual to your list of manuals |
Page 25 highlights
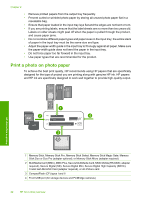
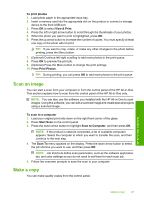
To print photos 1. Load photo paper in the appropriate input tray. 2. Insert a memory card into the appropriate slot on the product or connect a storage device to the front USB port. 3. Press OK to select View & Print. 4. Press the left or right arrow button to scroll through the thumbnails of your photos. 5. When the photo you want to print is highlighted, press OK. 6. Press the up arrow button to increase the number of copies. You must specify at least one copy or the photo will not print. TIP: If you want to crop, rotate, or make any other changes to the photo before printing, press the Menu button. 7. (Optional) Continue left-right scrolling to add more photos to the print queue. 8. Press OK to preview the print job. 9. (Optional) Press the Menu button to change the print settings. 10. Press Print Photos. TIP: During printing, you can press OK to add more photos to the print queue. Scan an image You can start a scan from your computer or from the control panel of the HP All-in-One. This section explains how to scan from the control panel of the HP All-in-One only. NOTE: You can also use the software you installed with the HP All-in-One to scan images. Using this software, you can edit a scanned image and create special projects using a scanned image. To scan to a computer 1. Load your original print side down on the right front corner of the glass. 2. Press Start Scan on the control panel. 3. Press the down arrow button to highlight Scan to Computer, and then press OK. NOTE: If the product is network-connected, a list of available computers appears. Select the computer to which you want to transfer the scan, and then continue to the next step. 4. The Scan To menu appears on the display. Press the down arrow button to select the job shortcut you want to use, and then press OK. NOTE: Job shortcuts define scan parameters, such as the software application, dpi, and color settings so you do not need to set them for each scan job. 5. Follow the onscreen prompts to save the scan to your computer. Make a copy You can make quality copies from the control panel. HP All-in-One overview Make a copy 23
-
 1
1 -
2
-
3
-
4
-
5
-
6
-
7
-
8
-
9
-
10
-
11
-
12
-
13
-
14
-
15
-
16
-
17
-
18
-
19
-
 20
20 -
 21
21 -
 22
22 -
 23
23 -
 24
24 -
 25
25 -
 26
26 -
 27
27 -
 28
28 -
 29
29 -
 30
30 -
31
-
32
-
33
-
34
-
35
-
36
-
37
-
38
-
39
 |
 |
