HP Photosmart C6300 Basic Guide - Page 4
Network setup, Set up the HP All-in-One on a wired (Ethernet) network - software
 |
View all HP Photosmart C6300 manuals
Add to My Manuals
Save this manual to your list of manuals |
Page 4 highlights
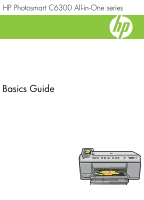
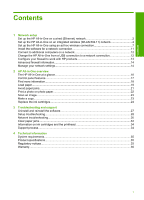
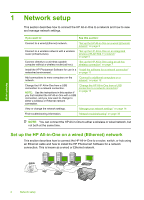
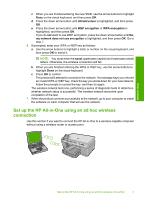
1 Network setup This section describes how to connect the HP All-in-One to a network and how to view and manage network settings. If you want to: See this section: Connect to a wired (Ethernet) network. "Set up the HP All-in-One on a wired (Ethernet) network" on page 2 Connect to a wireless network with a wireless router (infrastructure). "Set up the HP All-in-One on an integrated wireless (WLAN 802.11) network" on page 4 Connect directly to a wireless-capable computer without a wireless router (ad hoc). "Set up the HP All-in-One using an ad hoc wireless connection" on page 7 Install the HP Photosmart Software for use in a "Install the software for a network connection" networked environment. on page 11 Add connections to more computers on the network. "Connect to additional computers on a network" on page 12 Change the HP All-in-One from a USB connection to a network connection. NOTE: Use the instructions in this section if you first installed the HP All-in-One with a USB connection, and you now want to change to either a wireless or Ethernet network connection. "Change the HP All-in-One from a USB connection to a network connection" on page 12 View or change the network settings. "Manage your network settings" on page 14 Find troubleshooting information. "Network troubleshooting" on page 30 NOTE: You can connect the HP All-in-One to either a wireless or wired network, but not both at the same time. Set up the HP All-in-One on a wired (Ethernet) network This section describes how to connect the HP All-in-One to a router, switch, or hub using an Ethernet cable and how to install the HP Photosmart Software for a network connection. This is known as a wired or Ethernet network. Network setup 2 Network setup
-
 1
1 -
 2
2 -
 3
3 -
 4
4 -
 5
5 -
 6
6 -
 7
7 -
 8
8 -
 9
9 -
 10
10 -
11
-
12
-
13
-
14
-
15
-
16
-
17
-
18
-
19
-
20
-
21
-
22
-
23
-
24
-
25
-
26
-
27
-
28
-
29
-
30
-
31
-
32
-
33
-
34
-
35
-
36
-
37
-
38
-
39
 |
 |