HP Photosmart M23 HP Photosmart M22/23 Digital Camera with HP Instant Share - - Page 17
Delete, Format Card, Total Images Summary, Screen, Move Images to Card - memory card
 |
View all HP Photosmart M23 manuals
Add to My Manuals
Save this manual to your list of manuals |
Page 17 highlights
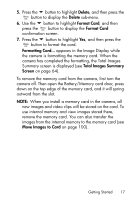
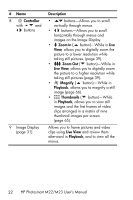
5. Press the button to highlight Delete, and then press the button to display the Delete sub-menu. 6. Use the button to highlight Format Card, and then press the button to display the Format Card confirmation screen. 7. Press the button to highlight Yes, and then press the button to format the card. Formatting Card... appears in the Image Display while the camera is formatting the memory card. When the camera has completed the formatting, the Total Images Summary screen is displayed (see Total Images Summary Screen on page 64). To remove the memory card from the camera, first turn the camera off. Then open the Battery/Memory card door, press down on the top edge of the memory card, and it will spring outward from the slot. NOTE: When you install a memory card in the camera, all new images and video clips will be stored on the card. To use internal memory and view images stored there, remove the memory card. You can also transfer the images from the internal memory to the memory card (see Move Images to Card on page 100). Getting Started 17
-
 1
1 -
2
-
3
-
4
-
5
-
6
-
7
-
8
-
9
-
10
-
11
-
 12
12 -
 13
13 -
 14
14 -
 15
15 -
 16
16 -
 17
17 -
 18
18 -
 19
19 -
 20
20 -
 21
21 -
 22
22 -
23
-
24
-
25
-
26
-
27
-
28
-
29
-
30
-
31
-
32
-
33
-
34
-
35
-
36
-
37
-
38
-
39
-
40
-
41
-
42
-
43
-
44
-
45
-
46
-
47
-
48
-
49
-
50
-
51
-
52
-
53
-
54
-
55
-
56
-
57
-
58
-
59
-
60
-
61
-
62
-
63
-
64
-
65
-
66
-
67
-
68
-
69
-
70
-
71
-
72
-
73
-
74
-
75
-
76
-
77
-
78
-
79
-
80
-
81
-
82
-
83
-
84
-
85
-
86
-
87
-
88
-
89
-
90
-
91
-
92
-
93
-
94
-
95
-
96
-
97
-
98
-
99
-
100
-
101
-
102
-
103
-
104
-
105
-
106
-
107
-
108
-
109
-
110
-
111
-
112
-
113
-
114
-
115
-
116
-
117
-
118
-
119
-
120
-
121
-
122
-
123
-
124
-
125
-
126
-
127
-
128
-
129
-
130
-
131
-
132
-
133
-
134
-
135
-
136
-
137
-
138
-
139
-
140
-
141
-
142
-
143
-
144
-
145
-
146
-
147
-
148
-
149
-
150
-
151
-
152
-
153
-
154
-
155
-
156
-
157
-
158
-
159
-
160
-
161
-
162
-
163
-
164
-
165
-
166
-
167
-
168
-
169
-
170
-
171
-
172
-
173
-
174
-
175
-
176
-
177
-
178
-
179
-
180
 |
 |
