HP Photosmart M23 HP Photosmart M22/23 Digital Camera with HP Instant Share - - Page 71
Remove Red Eyes
 |
View all HP Photosmart M23 manuals
Add to My Manuals
Save this manual to your list of manuals |
Page 71 highlights
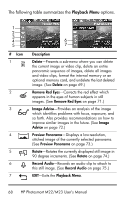
Remove Red Eyes In the Playback Menu (page 67), when you select Remove Red Eyes, the camera immediately begins processing the current still image to remove red eyes from the subjects in the image. The red-eye removal process takes a few seconds. After processing is complete, the corrected image displays with green boxes around corrected areas, along with the Remove Red Eyes sub-menu, which lists three options: • Save Changes-Saves the red-eye changes (overwriting the original image) and returns to the Playback Menu. • View Changes-Displays a magnified view of the image which has green boxes around the portions that were corrected for red eyes. You can pan around the image in this view. To return to the Remove Red Eyes Menu, press the button. • Cancel-Returns to the Playback Menu without saving the red-eye changes. NOTE: Remove Red Eyes is only available for still images that were taken with a flash. This option is not available for video clips. Reviewing Images and Video Clips 71
-
 1
1 -
2
-
3
-
4
-
5
-
6
-
7
-
8
-
9
-
10
-
11
-
12
-
13
-
14
-
15
-
16
-
17
-
18
-
19
-
20
-
21
-
22
-
23
-
24
-
25
-
26
-
27
-
28
-
29
-
30
-
31
-
32
-
33
-
34
-
35
-
36
-
37
-
38
-
39
-
40
-
41
-
42
-
43
-
44
-
45
-
46
-
47
-
48
-
49
-
50
-
51
-
52
-
53
-
54
-
55
-
56
-
57
-
58
-
59
-
60
-
61
-
62
-
63
-
64
-
65
-
 66
66 -
 67
67 -
 68
68 -
 69
69 -
 70
70 -
 71
71 -
 72
72 -
 73
73 -
 74
74 -
 75
75 -
 76
76 -
77
-
78
-
79
-
80
-
81
-
82
-
83
-
84
-
85
-
86
-
87
-
88
-
89
-
90
-
91
-
92
-
93
-
94
-
95
-
96
-
97
-
98
-
99
-
100
-
101
-
102
-
103
-
104
-
105
-
106
-
107
-
108
-
109
-
110
-
111
-
112
-
113
-
114
-
115
-
116
-
117
-
118
-
119
-
120
-
121
-
122
-
123
-
124
-
125
-
126
-
127
-
128
-
129
-
130
-
131
-
132
-
133
-
134
-
135
-
136
-
137
-
138
-
139
-
140
-
141
-
142
-
143
-
144
-
145
-
146
-
147
-
148
-
149
-
150
-
151
-
152
-
153
-
154
-
155
-
156
-
157
-
158
-
159
-
160
-
161
-
162
-
163
-
164
-
165
-
166
-
167
-
168
-
169
-
170
-
171
-
172
-
173
-
174
-
175
-
176
-
177
-
178
-
179
-
180
 |
 |
