HP Server rp7420 HP 9000 rp7420 Server - User Service Guide, Fifth Edition - Page 38
Positioning the Lift Handles, Inserting the Pins Into the Rack
 |
View all HP Server rp7420 manuals
Add to My Manuals
Save this manual to your list of manuals |
Page 38 highlights
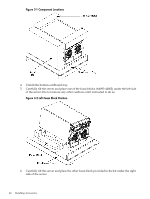
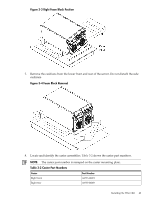
Figure 2-9 Positioning the Lift Handles 4. With one handle in each hand, install the pin end of the panel into the back side of the front rack mount ears on the chassis. Figure 2-10 Inserting the Pins Into the Rack 5. Pull the string plunger out, move the handles apart, and install the shoulder washer end of the panel into the keyway feature. 38 Unpacking the Server
-
 1
1 -
2
-
3
-
4
-
5
-
6
-
7
-
8
-
9
-
10
-
11
-
12
-
13
-
14
-
15
-
16
-
17
-
18
-
19
-
20
-
21
-
22
-
23
-
24
-
25
-
26
-
27
-
28
-
29
-
30
-
31
-
32
-
 33
33 -
 34
34 -
 35
35 -
 36
36 -
 37
37 -
 38
38 -
 39
39 -
 40
40 -
 41
41 -
 42
42 -
 43
43 -
44
-
45
-
46
-
47
-
48
-
49
-
50
-
51
-
52
-
53
-
54
-
55
-
56
-
57
-
58
-
59
-
60
-
61
-
62
-
63
-
64
-
65
-
66
-
67
-
68
-
69
-
70
-
71
-
72
-
73
-
74
-
75
-
76
-
77
-
78
-
79
-
80
-
81
-
82
-
83
-
84
-
85
-
86
-
87
-
88
-
89
-
90
-
91
-
92
-
93
-
94
-
95
-
96
-
97
-
98
-
99
-
100
-
101
-
102
-
103
-
104
-
105
-
106
-
107
-
108
-
109
-
110
-
111
-
112
-
113
-
114
-
115
-
116
-
117
-
118
-
119
-
120
-
121
-
122
-
123
-
124
-
125
-
126
-
127
 |
 |

Figure 2-9 Positioning the Lift Handles
4.
With one handle in each hand, install the pin end of the panel into the back side of the front
rack mount ears on the chassis.
Figure 2-10 Inserting the Pins Into the Rack
5.
Pull the string plunger out, move the handles apart, and install the shoulder washer end of
the panel into the keyway feature.
38
Unpacking the Server