HP Visualize b1000 hp Visualize b1000, c3000, c3600 workstations parts replace - Page 17
Replacing the Power Supply
 |
View all HP Visualize b1000 manuals
Add to My Manuals
Save this manual to your list of manuals |
Page 17 highlights
Figure 2-8. Tipping Up the Power Supply Spring Hinge Parts Removal and Replacement Power Supply Right-side Hinge Pin Bail Lock Bail 5. Disconnect the four cables shown below: three system power cables and the SCA hard disk backplane cable. Figure 2-9. Location of Power Cables Power Cables 6. Remove the power supply from the workstation: a. Holding the power supply handle, remove the bail from the bail lock. b. Slide the spring hinge lever toward the front of the workstation and rotate it downward to lock it in place. c. Slide the power supply toward the back of the workstation to disengage it from the right hinge pin, remove the power supply and set it aside. Replacing the Power Supply 1. To install the power supply: Chapter 2 17
-
 1
1 -
2
-
3
-
4
-
5
-
6
-
7
-
8
-
9
-
10
-
11
-
 12
12 -
 13
13 -
 14
14 -
 15
15 -
 16
16 -
 17
17 -
 18
18 -
 19
19 -
 20
20 -
 21
21 -
 22
22 -
23
-
24
-
25
-
26
-
27
-
28
-
29
-
30
-
31
-
32
-
33
-
34
-
35
-
36
-
37
-
38
-
39
-
40
-
41
-
42
-
43
-
44
-
45
-
46
-
47
-
48
 |
 |

Chapter 2
17
Parts Removal and Replacement
Power Supply
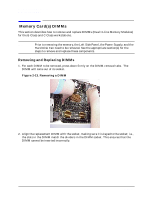
Figure 2-8. Tipping Up the Power Supply
5.
Disconnect the four cables shown below: three system power cables and the SCA hard
disk backplane cable.
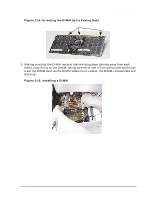
Figure 2-9. Location of Power Cables
6.
Remove the power supply from the workstation:
a.
Holding the power supply handle, remove the bail from the bail lock.
b.
Slide the spring hinge lever toward the front of the workstation and rotate it
downward to lock it in place.
c.
Slide the power supply toward the back of the workstation to disengage it from the
right hinge pin, remove the power supply and set it aside.
Replacing the Power Supply
1.
To install the power supply:
Right-side Hinge Pin
Bail
Spring Hinge
Bail
Lock
Power Cables