HP Visualize b1000 hp Visualize b1000, c3000, c3600 workstations parts replace - Page 23
Replacing PCI I/O Cards
 |
View all HP Visualize b1000 manuals
Add to My Manuals
Save this manual to your list of manuals |
Page 23 highlights
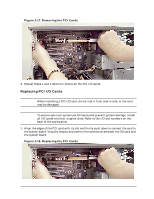
Figure 2-17. Removing the PCI Cards Parts Removal and Replacement PCI I/O Cards 3. Repeat Steps 1 and 2 above to remove all the PCI I/O cards. Replacing PCI I/O Cards CAUTION When installing a PCI I/O card, do not rock it from side to side, or the card may be damaged. CAUTION To ensure optimum system performance and prevent system damage, install all I/O cards into their original slots. Refer to the I/O slot numbers on the back of the workstation. 1. Align the edges of the PCI card with its slot and firmly push down to connect the card to the system board. Visually inspect and confirm the connection between the I/O card and the system board. Figure 2-18. Replacing the PCI Cards Chapter 2 23
-
 1
1 -
2
-
3
-
4
-
5
-
6
-
7
-
8
-
9
-
10
-
11
-
12
-
13
-
14
-
15
-
16
-
17
-
 18
18 -
 19
19 -
 20
20 -
 21
21 -
 22
22 -
 23
23 -
 24
24 -
 25
25 -
 26
26 -
 27
27 -
 28
28 -
29
-
30
-
31
-
32
-
33
-
34
-
35
-
36
-
37
-
38
-
39
-
40
-
41
-
42
-
43
-
44
-
45
-
46
-
47
-
48
 |
 |

Chapter 2
23
Parts Removal and Replacement
PCI I/O Cards
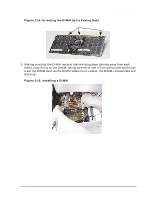
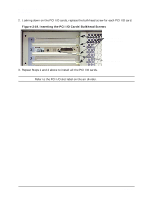
Figure 2-17. Removing the PCI Cards
3.
Repeat Steps 1 and 2 above to remove all the PCI I/O cards.
Replacing PCI I/O Cards
CAUTION
When installing a PCI I/O card,
do not
rock it from side to side, or the card
may be damaged.
CAUTION
To ensure optimum system performance and prevent system damage, install
all I/O cards into their original slots. Refer to the I/O slot numbers on the
back of the workstation.
1. Align the edges of the PCI card with its slot and firmly push down to connect the card to
the system board. Visually inspect and confirm the connection between the I/O card and
the system board.
Figure 2-18. Replacing the PCI Cards