HP Visualize b1000 hp Visualize b1000, c3000, c3600 workstations parts replace - Page 32
Replacing the Floppy Disk Drive
 |
View all HP Visualize b1000 manuals
Add to My Manuals
Save this manual to your list of manuals |
Page 32 highlights
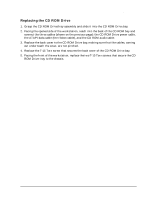
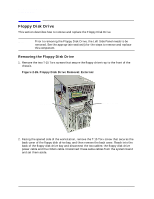
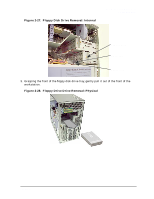
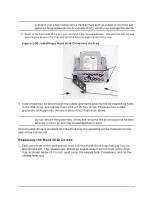
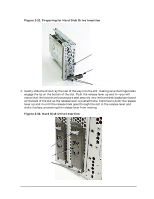
Parts Removal and Replacement Floppy Disk Drive Replacing the Floppy Disk Drive 1. Grasp the floppy disk drive/tray assembly and slide it into the floppydisk drive bay of the chassis. 2. Facing the opened side of the workstation, reach into the back of the floppy disk drive bay and connect the two cables (shown on the previous page): the floppy disk drive power cable and the ribbon cable. 3. Replace the back cover to the floppy drive bay, making sure that the cables, coming out underneath the cover, are not pinched. 4. Replace the T-15 Torx screw that secures the back cover of the floppy disk drive bay. 5. Facing the front of the workstation, replace the two T-15 Torx screws that secure the floppy disk drive tray to the chassis. 32 Chapter 2
-
 1
1 -
2
-
3
-
4
-
5
-
6
-
7
-
8
-
9
-
10
-
11
-
12
-
13
-
14
-
15
-
16
-
17
-
18
-
19
-
20
-
21
-
22
-
23
-
24
-
25
-
26
-
 27
27 -
 28
28 -
 29
29 -
 30
30 -
 31
31 -
 32
32 -
 33
33 -
 34
34 -
 35
35 -
 36
36 -
 37
37 -
38
-
39
-
40
-
41
-
42
-
43
-
44
-
45
-
46
-
47
-
48
 |
 |

32
Chapter 2
Parts Removal and Replacement
Floppy Disk Drive
Replacing the Floppy Disk Drive
1.
Grasp the floppy disk drive/tray assembly and slide it into the floppydisk drive bay of
the chassis.
2.
Facing the opened side of the workstation, reach into the back of the floppy disk drive
bay and connect the two cables (shown on the previous page): the floppy disk drive
power cable and the ribbon cable.
3.
Replace the back cover to the floppy drive bay, making sure that the cables, coming out
underneath the cover, are not pinched.
4.
Replace the T-15 Torx screw that secures the back cover of the floppy disk drive bay.
5.
Facing the front of the workstation, replace the two T-15 Torx screws that secure the
floppy disk drive tray to the chassis.