HP Visualize b1000 hp Visualize b1000, c3000, c3600 workstations parts replace - Page 21
Orienting the DIMM by its Keying Slots, Installing a DIMM
 |
View all HP Visualize b1000 manuals
Add to My Manuals
Save this manual to your list of manuals |
Page 21 highlights
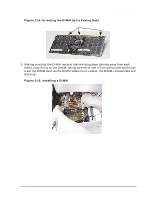
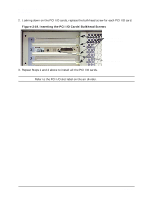
Figure 2-14. Orienting the DIMM by its Keying Slots Keying Slots Parts Removal and Replacement Memory Card(s) DIMMs 3. Making sure that the DIMM-removal tabs are lying down (aiming away from each other), push firmly on the DIMM, taking care not to rock it from side to side, as this can crack the DIMM card. As the DIMM slides into its socket, the DIMM-removal tabs will stand up. Figure 2-15. Installing a DIMM Chapter 2 21
-
 1
1 -
2
-
3
-
4
-
5
-
6
-
7
-
8
-
9
-
10
-
11
-
12
-
13
-
14
-
15
-
 16
16 -
 17
17 -
 18
18 -
 19
19 -
 20
20 -
 21
21 -
 22
22 -
 23
23 -
 24
24 -
 25
25 -
 26
26 -
27
-
28
-
29
-
30
-
31
-
32
-
33
-
34
-
35
-
36
-
37
-
38
-
39
-
40
-
41
-
42
-
43
-
44
-
45
-
46
-
47
-
48
 |
 |

Chapter 2
21
Parts Removal and Replacement
Memory Card(s) DIMMs
Figure 2-14. Orienting the DIMM by its Keying Slots
3.
Making sure that the DIMM-removal tabs are lying down (aiming away from each
other), push firmly on the DIMM,
taking care not to rock it from side to side,
as this can
crack the DIMM card. As the DIMM slides into its socket, the DIMM-removal tabs will
stand up.
Figure 2-15. Installing a DIMM
Keying Slots