HP Visualize b1000 hp Visualize b1000, c3000, c3600 workstations parts replace - Page 39
Removing the old System Board
 |
View all HP Visualize b1000 manuals
Add to My Manuals
Save this manual to your list of manuals |
Page 39 highlights
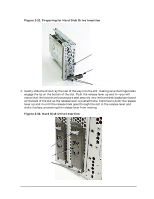
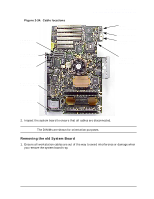
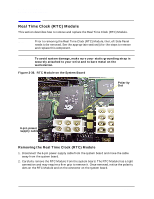
Figure 2-34. Cable locations CD ROM Drive Data Connector Top Sys. Board Fan Power Connector Floppy Drive Data Connector Bottom Sys. Board Fan Power Connector Ultra 2 Wide LVD SCSI Connector Parts Removal and Replacement Removing and Replacing the System Board I/O Fan Power Connector Speaker Connector Front-Panel Display Connector CD ROM Drive Power Cable Connector 2. Inspect the system board to ensure that all cables are disconnected. NOTE The DIMMs are shown for orientation purposes. Removing the old System Board 1. Ensure all workstation cables are out of the way to avoid interference or damage when you remove the system board tray. Chapter 2 39
-
 1
1 -
2
-
3
-
4
-
5
-
6
-
7
-
8
-
9
-
10
-
11
-
12
-
13
-
14
-
15
-
16
-
17
-
18
-
19
-
20
-
21
-
22
-
23
-
24
-
25
-
26
-
27
-
28
-
29
-
30
-
31
-
32
-
33
-
 34
34 -
 35
35 -
 36
36 -
 37
37 -
 38
38 -
 39
39 -
 40
40 -
 41
41 -
 42
42 -
 43
43 -
 44
44 -
45
-
46
-
47
-
48
 |
 |

Chapter 2
39
Parts Removal and Replacement
Removing and Replacing the System Board
Figure 2-34. Cable locations
2.
Inspect the system board to ensure that all cables are disconnected.
NOTE
The DIMMs are shown for orientation purposes.
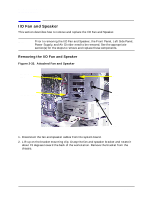
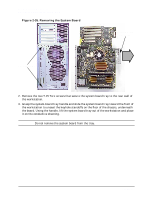
Removing the old System Board
1.
Ensure all workstation cables are out of the way to avoid interference or damage when
you remove the system board tray.
Speaker Connector
Bottom Sys. Board Fan
Power Connector
Top Sys. Board Fan
Power Connector
I/O Fan
Power Connector
CD ROM Drive
Front-Panel Display
Connector
CD ROM Drive
Data Connector
Floppy Drive
Data Connector
Ultra 2 Wide LVD
SCSI Connector
Cable Connector
Power