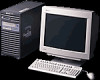
HP Visualize b1000 hp Visualize b1000, c3000, c3600 workstations parts replace - Page 18
Reinstalling the Power Supply, Location of Power Cables
 |
View all HP Visualize b1000 manuals
Add to My Manuals
Save this manual to your list of manuals |
Page 18 highlights
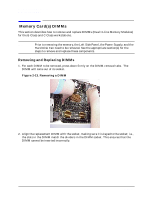
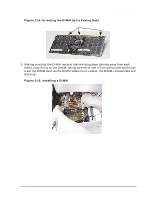
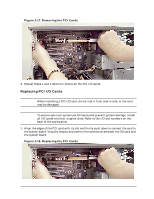
Parts Removal and Replacement Power Supply a. Pick up the power supply by the handle and position its right-side hinge pin into the right side hinge bracket, as shown below. b. Align the shaft of the spring hinge (on the left side) with its hole in the hinge bracket, release the spring-hinge lever, and let it snap left into the hole. Figure 2-10. Reinstalling the Power Supply Spring Hinge Right-side Hinge Pin Bail Lock Bail 2. Connect the four power cables. • Three system power cables • SCA hard-disk backplane power cable Figure 2-11. Location of Power Cables Power Cables 3. Lift the handle edge of the power supply enough to allow the bail lock to be disengaged from the bail, fold the bail lock down, and the lower the power supply back into place. 4. Alternately tighten the two captive T-15 Torx screws in the corners of the power supply. 18 Chapter 2
-
 1
1 -
2
-
3
-
4
-
5
-
6
-
7
-
8
-
9
-
10
-
11
-
12
-
 13
13 -
 14
14 -
 15
15 -
 16
16 -
 17
17 -
 18
18 -
 19
19 -
 20
20 -
 21
21 -
 22
22 -
 23
23 -
24
-
25
-
26
-
27
-
28
-
29
-
30
-
31
-
32
-
33
-
34
-
35
-
36
-
37
-
38
-
39
-
40
-
41
-
42
-
43
-
44
-
45
-
46
-
47
-
48
 |
 |
