HP Visualize b1000 hp Visualize b1000, c3000, c3600 workstations parts replace - Page 41
Replacing the System Board
 |
View all HP Visualize b1000 manuals
Add to My Manuals
Save this manual to your list of manuals |
Page 41 highlights
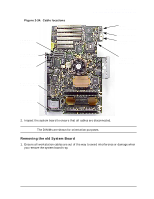
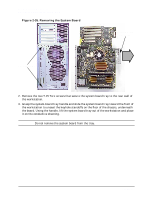
Parts Removal and Replacement Removing and Replacing the System Board Replacing the System Board 1. Position the system board tray in the chassis. When it is flat in the workstation, align the system board tray's keyholes with the standoffs on the side wall of the chassis, and then slide the system board tray toward the back of the workstation to seat the standoffs into their corresponding keyholes. 2. Replace the two T-15 Torx screws that secure the system board tray to the rear wall of the workstation. 3. Reconnect the system board cables. 4. Place the old system board tray into the protective packaging from the new replacement system board and put it aside. Chapter 2 41
-
 1
1 -
2
-
3
-
4
-
5
-
6
-
7
-
8
-
9
-
10
-
11
-
12
-
13
-
14
-
15
-
16
-
17
-
18
-
19
-
20
-
21
-
22
-
23
-
24
-
25
-
26
-
27
-
28
-
29
-
30
-
31
-
32
-
33
-
34
-
35
-
 36
36 -
 37
37 -
 38
38 -
 39
39 -
 40
40 -
 41
41 -
 42
42 -
 43
43 -
 44
44 -
 45
45 -
 46
46 -
47
-
48
 |
 |

Chapter 2
41
Parts Removal and Replacement
Removing and Replacing the System Board
Replacing the System Board
1.
Position the system board tray in the chassis. When it is flat in the workstation, align
the system board tray’s keyholes with the standoffs on the side wall of the chassis, and
then slide the system board tray toward the back of the workstation to seat the
standoffs into their corresponding keyholes.
2.
Replace the two T-15 Torx screws that secure the system board tray to the rear wall of
the workstation.
3.
Reconnect the system board cables.
4. Place the old system board tray into the protective packaging from the new replacement
system board and put it aside.