HP Z210 HP Z210 Workstation Series User Guide - Page 51
Closing the expansion card retention clamp Z210 SFF
 |
View all HP Z210 manuals
Add to My Manuals
Save this manual to your list of manuals |
Page 51 highlights
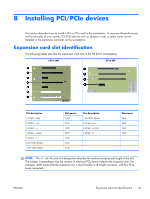
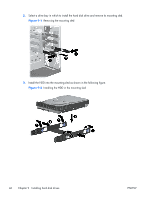
2. Align the card keyway with the slot key, and then firmly seat the card in the slot as shown in the following illustration (1). Figure 8-1 Installing an expansion card (Z210 CMT shown) 3. Close the retention clamp by rotating it downward (2) as shown in the illustration above. NOTE: For the Z210 SFF Workstation, close the expansion slot retention clamp making sure all cards are seated. Figure 8-2 Closing the expansion card retention clamp (Z210 SFF) 4. Connect all necessary power and interface cables to the card (follow instructions that came with the expansion card). 5. Replace all components removed in preparation for component installation. ENWW Installing an expansion card 43
-
 1
1 -
2
-
3
-
4
-
5
-
6
-
7
-
8
-
9
-
10
-
11
-
12
-
13
-
14
-
15
-
16
-
17
-
18
-
19
-
20
-
21
-
22
-
23
-
24
-
25
-
26
-
27
-
28
-
29
-
30
-
31
-
32
-
33
-
34
-
35
-
36
-
37
-
38
-
39
-
40
-
41
-
42
-
43
-
44
-
45
-
 46
46 -
 47
47 -
 48
48 -
 49
49 -
 50
50 -
 51
51 -
 52
52 -
 53
53 -
 54
54 -
 55
55 -
 56
56 -
57
-
58
-
59
-
60
-
61
-
62
-
63
-
64
-
65
-
66
-
67
-
68
 |
 |

2.
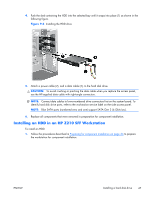
Align the card keyway with the slot key, and then firmly seat the card in the slot as shown in the
following illustration (1).
Figure 8-1
Installing an expansion card (Z210 CMT shown)
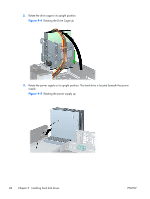
3.
Close the retention clamp by rotating it downward (2) as shown in the illustration above.
NOTE:
For the Z210 SFF Workstation, close the expansion slot retention clamp making sure all
cards are seated.
Figure 8-2
Closing the expansion card retention clamp (Z210 SFF)
4.
Connect all necessary power and interface cables to the card (follow instructions that came with
the expansion card).
5.
Replace all components removed in preparation for component installation.
ENWW
Installing an expansion card
43