HP Z210 HP Z210 Workstation Series User Guide - Page 63
Installing an optical drive (desktop configuration), CAUTION
 |
View all HP Z210 manuals
Add to My Manuals
Save this manual to your list of manuals |
Page 63 highlights
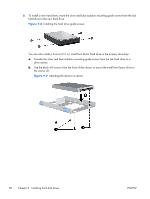
Installing an optical drive (desktop configuration) 1. Follow the procedures described in Preparing for component installation on page 34 to prepare the workstation for component installation. 2. If necessary, remove the EMI filler from the front of the optical bay. 3. Install four black metric M3 guide screws into the drive (1). Spare metric M3 screws are stored on the side of the optical bay. Figure 10-4 Installing the optical drive 4. Align the screws with the grooves in the drive bay and gently slide the drive into the bay until it snaps into place (2). CAUTION: Ensure that the optical drive is secure in the workstation chassis by pulling the drive to see if it can become disengaged. Failure to properly secure the drive can cause damage to the drive when moving the workstation. 5. Connect the power and drive cables to the drive and system board. Figure 10-5 Connecting the power and data cables ENWW Installing an optical drive in an HP Z210 CMT Workstation 55
-
 1
1 -
2
-
3
-
4
-
5
-
6
-
7
-
8
-
9
-
10
-
11
-
12
-
13
-
14
-
15
-
16
-
17
-
18
-
19
-
20
-
21
-
22
-
23
-
24
-
25
-
26
-
27
-
28
-
29
-
30
-
31
-
32
-
33
-
34
-
35
-
36
-
37
-
38
-
39
-
40
-
41
-
42
-
43
-
44
-
45
-
46
-
47
-
48
-
49
-
50
-
51
-
52
-
53
-
54
-
55
-
56
-
57
-
 58
58 -
 59
59 -
 60
60 -
 61
61 -
 62
62 -
 63
63 -
 64
64 -
 65
65 -
 66
66 -
 67
67 -
 68
68
 |
 |
