HP c3700 hp Visualize b2000 UNIX workstation service handbook (a5983-90039) - Page 111
I/O Slot Numbering, Removing I/O Cards
 |
View all HP c3700 manuals
Add to My Manuals
Save this manual to your list of manuals |
Page 111 highlights
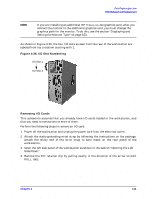
Field Replaceable Units FRU Removal and Replacement NOTE If you are installing an additional HP VISUALIZE-fxe graphics card, after you connect the monitor to the additional graphics card, you must change the graphics path for the monitor. To do this, see the section "Displaying and Setting the Monitor Type" on page 150. As shown in Figure 4-36, the four I/O slots as seen from the rear of the workstation are labeled from top to bottom starting with 1. Figure 4-36. I/O Slot Numbering I/O Slot 1 { I/O Slot 4 Removing I/O Cards This subsection assumes that you already have I/O cards loaded in the workstation, and that you need to remove one or more of them. Perform the following steps to remove an I/O card: 1. Power off the workstation and unplug the power cord from the electrical outlet. 2. Attach the static-grounding wrist strap by following the instructions on the package. Attach the sticky end of the wrist strap to bare metal on the rear panel of the workstation. 3. Open the left side panel of the workstation as shown in the section "Opening the Left Side Panel." 4. Remove the PCI retainer clip by pulling evenly in the direction of the arrow on both PULL tabs. Chapter 4 111
-
 1
1 -
2
-
3
-
4
-
5
-
6
-
7
-
8
-
9
-
10
-
11
-
12
-
13
-
14
-
15
-
16
-
17
-
18
-
19
-
20
-
21
-
22
-
23
-
24
-
25
-
26
-
27
-
28
-
29
-
30
-
31
-
32
-
33
-
34
-
35
-
36
-
37
-
38
-
39
-
40
-
41
-
42
-
43
-
44
-
45
-
46
-
47
-
48
-
49
-
50
-
51
-
52
-
53
-
54
-
55
-
56
-
57
-
58
-
59
-
60
-
61
-
62
-
63
-
64
-
65
-
66
-
67
-
68
-
69
-
70
-
71
-
72
-
73
-
74
-
75
-
76
-
77
-
78
-
79
-
80
-
81
-
82
-
83
-
84
-
85
-
86
-
87
-
88
-
89
-
90
-
91
-
92
-
93
-
94
-
95
-
96
-
97
-
98
-
99
-
100
-
101
-
102
-
103
-
104
-
105
-
 106
106 -
 107
107 -
 108
108 -
 109
109 -
 110
110 -
 111
111 -
 112
112 -
 113
113 -
 114
114 -
 115
115 -
 116
116 -
117
-
118
-
119
-
120
-
121
-
122
-
123
-
124
-
125
-
126
-
127
-
128
-
129
-
130
-
131
-
132
-
133
-
134
-
135
-
136
-
137
-
138
-
139
-
140
-
141
-
142
-
143
-
144
-
145
-
146
-
147
-
148
-
149
-
150
-
151
-
152
-
153
-
154
-
155
-
156
-
157
-
158
-
159
-
160
-
161
-
162
-
163
-
164
-
165
-
166
-
167
-
168
-
169
-
170
-
171
-
172
-
173
-
174
-
175
-
176
-
177
-
178
-
179
-
180
-
181
-
182
-
183
-
184
-
185
-
186
-
187
-
188
-
189
-
190
-
191
-
192
-
193
-
194
-
195
-
196
-
197
-
198
-
199
-
200
-
201
-
202
-
203
-
204
 |
 |
